Quantcast
Channel: V5 Tutorial - SambaClub Forum
Viewing all 231 articles
Browse latest View live

TUTORIAL: Custom +/- Buttons

$
0
0

@JTRTech wrote:

So following some tricky automation I found myself needing to ‘catch’ order quantity changes on the +/- buttons but that’s currently only possible through Ticket Total Changed event but that gave me other issues as was working with calculations.
Anyway.

Automation Commands
Plus Quantity
image

Minus Quantity
image

Both will want mapping to order line with visible state of New

Automation Command Executed Rule

You could get creative with order states to make minus disable on 1 quantity but opted just for action constraints.

Posts: 8

Participants: 4

Read full topic


Simple Seat Table States

$
0
0

@antasp3136 wrote:

So I have been going back and forth over the different ways to Seat a table so that hosteses can see that a table has been seated before a order is added to a ticket. Most of the things ive tried have work but with some issues because when a ticket is opened and closed the order count and other thinks keep it from updating the state properly so I decided to make it super simple and go about it a different way and it seems to be working without any of the issues ive experienced in the past. Below is my setup if it will benefit others.

Two Automation Commnads: Seated, Seat Table
No Mappings set on both.

image

image

Seat Table Ask Question Action:

Broadcast Message Action to refresh the Entity Screen:

image

Seat Table Ask Question Rule:

image

Table Seated Rule:

image

Seated State:

image

Entity Screen Automation Command Button:

image

End Results:

May not work for everyone but it works for me and was very simple to implement and doesnt mess with any of the order rules. This is strictly to be able to visually see that a table is seated and no orders taken.

Posts: 1

Participants: 1

Read full topic

Cash tended and change returned

$
0
0

@Dennis_Jackman wrote:

I would like to know how I include cash tended and change given on printed receipt. Right now it just shows total bill. Thanks in advance.

Posts: 5

Participants: 3

Read full topic

Simple Coffe Card Reward System

$
0
0

@Muzzargh wrote:

I wanted to implement a simple points reward system for our coffee customers. 1 point per coffee and when they had accumulated 6 points the next one was free. As there was nothing that matched my needs I came up with the following. Special thanks to Nizamettin (Nizam) for the inspiration and Joe (JTRTech), Jesse (Jesse), Rick (RickH), Bob (Bob_Be) and Arian A (ATechAsis) for all their help in getting this running!

Is is perfect? Probably not. But it does the job. Feel free to make any suggestions for additions/alterations to this and I’ll update it.

Simple Coffee Rewards System.pdf (678.4 KB)

Posts: 1

Participants: 1

Read full topic

Customer Purchase History with Display/Print Ticket

$
0
0

@Bob_be wrote:

This tutorial written to help new users get a familiar with some of the configuration that are available within SambaPOS. It also shows a little into how development process of a creating a system.

I’ll post a condensed version in a separate post below.

Before you start, I recommend that you think and write down what fields you want to display. I hope to provide enough information for anyone to be able to add/replace fields for their needs.

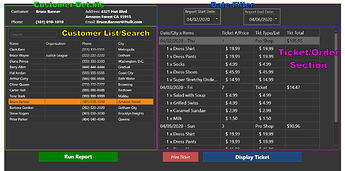
But first lets look at the finished produce:


As you can see there are 4 main sections to this screen.
  • Customer details*
  • Customer List/Search*
  • Date Filter
  • Ticket/Order section*

*Sections that can be modified for users preferences.

Report (1 of 2): Customer List

Report Name: CPH-Customers Report
Page Size: 500
Display in Report Explorer: (unchecked)
Visual Printing: (unchecked)
Template: (We will build one step by step below.)

Everybody’s report is going to be different! Below, I will help create the report for your own needs.
The source for reports can be found here: https://kb.sambapos.com/en/cat/reports/

The first line we need to create is the header (table name) and the number of columns. The normal report structure for the first line would be [<table name>:#,#]. We will call this first report table Customers. We don’tknow how many columns we will need, for now we will start with 4 (we will come back and change it later). Our first line will look like this: [Customers:1,1,1,1]. There is a special tool we will need to use to convert a conventional report into a Table View, that will give some unique tools to work with on the Customer Purchase History screen. We will need add a # just before the table name. Our report should look like this:

[#Customers:1,1,1,1]

The next row we need is Column Headers. The start of the row will need a > (greater sign),in a normal report this would this row headers bold. However, in Table View this will disignated as column headers. Columns names are separated with a pipe character ( | ). For now, I’m going to name my headers Name, Organization, Phone & City (yours can be different). We will be expanding this later once we know the fields we are going to use. Our report should look similar to this:

[#Customers:1,1,1,1]
>Name|Organization|Phone|City

Report syntax explanation

Reports syntax is this:
{<REPORT NAME>:<field(s)>:<expression>:<format>:<delimiter>}

Report Part Explanation
<REPORT NAME> Name of the report to run. All capital letters.
<field(s)> Fields are separated with a comma. When Report name is typed correctly, a list of available fields for the report will pop-up after the colon or comma. Custom field names will not shown, they will have to typed in.
<expression> Think of this as a filter. Used to narrow down the results to get the desired results.
<format> (optional) A way of displaying, not displaying, calculating, combining fields into column and/or re-arrange columns the results of the report fields. Encased in curly brackets, starting with the number 0 (zero) {0}, separating columns with a pipe character ( | ). When no format is present, fields will be used.
<delimiter> (optional) When building a list, a way of separating each results.

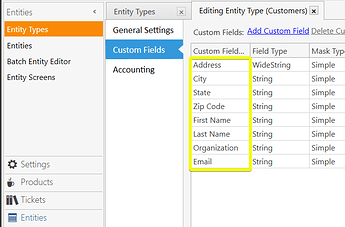
Before we go any further, you will need to look at your Customers Entity Type settings. Manage->Entities->Entity Types->Customers->Custom Fields. This is what this example looks like:


This is where you will find the fields you will need to for your report.

<REPORT NAME>

The final part of the report we are going to be using the
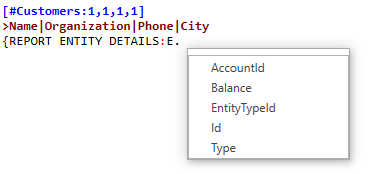
{REPORT ENTITY DETAILS: report.

<field(s)>

The first field will be E.Name, you will notice after you typed the colon a pop-up appears with 2 options:
D326YyRVUE
If we select E, then type a period, another pop-up will appear displaying the available fields:
6VrcntayJc
However Name is not listed, but we will type in. Our report should look similar to this:
[#Customers:1,1,1,1]
>Name|Organization|Phone|City
{REPORT ENTITY DETAILS:E.Name

Next we will type a comma then EC followed by a period. Now we will use an Entity Custom Field name. Followed by another comma. Continue 2 more times using a different field name and add a colon at the end. Now our report should look similar to this:

[#Customers:1,1,1,1]
>Name|Organization|Phone|City
{REPORT ENTITY DETAILS:E.Name,EC.Organization,EC.Phone,EC.City:

<expression>

Now we need to filter this report. If we didn’t filter this report, SambaPOS will not know what entity we want displayed. It will display all entities including Table entities and any other entities. To filter this report we are going to use (ET=Customers). This is telling to report to filter using Entities (ET for short) equals Customers. Lets end this report with a ending curly bracket }. The report should look similar to this:

[#Customers:1,1,1,1]
>Name|Organization|Phone|City
{REPORT ENTITY DETAILS:E.Name,EC.Organization,EC.Phone,EC.City:(ET=Customers)}

:exclamation: The most common mistake is not closing out brackets. You will know that reports did not have closing brackets when you try to run the report, SambaPOS will freeze, then windows will show a unresponsive window. SambaPOS will have to forced closed. Any changes made will not be saved.
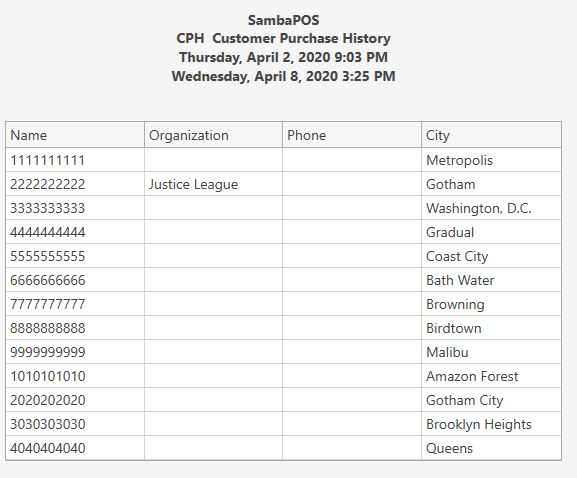
Lets save the report, then reopen it and view it. (Because we are using Table View, if you don’t save it you will get an error message.)

TJPoa4Vc6c
As you can see I made a few mistake with the fields, but we are making progress! I’m using a phone number as the primary field (E.Name) and I don’t have a custom field called Phone (EC.Phone). I will move the E.Name field behind EC.Organization field and replace it with 2 fields, EC.First Name & EC.Last Name. I will also put in the remaining custom fields. The report looks like this:

[#Customers:1,1,1,1]
>Name|Organization|Phone|City|Address|State|Zip Code|Email|Primary
{REPORT ENTITY DETAILS:EC.First Name,EC.Last Name,EC.Organization,E.Name,EC.City,EC.Address,EC.State,EC.Zip Code,EC.Email,E.Name:(ET=Customers)}

You will notice that I have 9 column headings (in blue).

We will have to adjust the header column count numbers to match the column count of the column Header. The very top of the report we will add 5 more 1. It should look like this:

[#Customers:1,1,1,1,1,1,1,1,1]
>Name|Organization|Phone|City|Address|State|Zip Code|Email|Primary
{REPORT ENTITY DETAILS:EC.First Name,EC.Last Name,EC.Organization,E.Name,EC.City,EC.Address,EC.State,EC.Zip Code,EC.Email,E.Name:(ET=Customers)}

You will also notice, in this example, we have 10 fields (the red numbers) in the report. We will combine 2 fields into 1 column using <format>. Depending on how you have structured your Customer Entities, you may have equal numbers.

<format>

Using format we can pick a report field and place it where we want it. We can also combine fields into a single column. The first report field will start with {0}.


We will add another colon behind (ET=Customers) and before the ending curly bracket }. The first report field is going to label {0}, add a space, then add {1}, followed by a pipe character. The pipe character is used as a separator for columns.

Our report is going to start looking similar to this:

[#Customers:1,1,1,1,1,1,1,1,1]
>Name|Organization|Phone|City|Address|State|Zip Code|Email|Primary
{REPORT ENTITY DETAILS:EC.First Name,EC.Last Name,EC.Organization,E.Name,EC.City,EC.Address,EC.State,EC.Zip Code,EC.Email,E.Name:(ET=Customers):{0} {1}|}

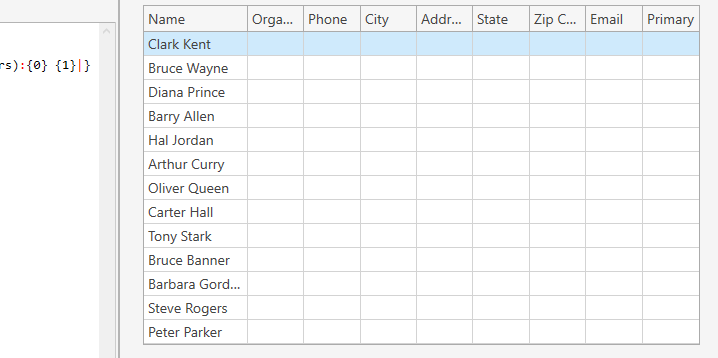
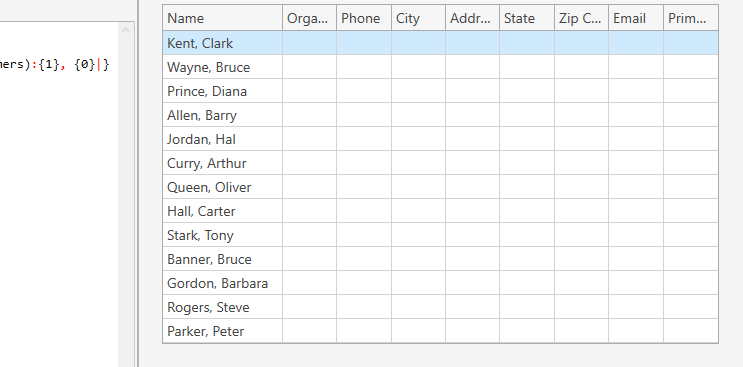
We will save the report, reopen it and Preview it:

Notice, since we only defined the first 2 report fields in the first column, those are the only ones displayed.

Alternative way to display First Name & Last Name

Let’s change the format display. We will switch the format fields and place a comma between to display Last Name, First Name


If you wanted to sort by last name we will need to add the tag .asc to the report field ( EC.Last Name.asc ) By default, this report will list names as they were entered into SambaPOS.

Let’s fill in the rest of the format fields. Our report should look similar to this now:
[#Customers:1,1,1,1,1,1,1,1,1]
>Name|Organization|Phone|City|Address|State|Zip Code|Email|Primary
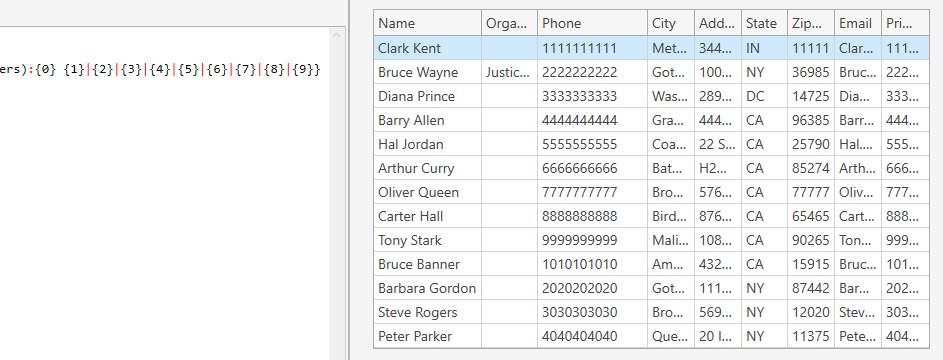
{REPORT ENTITY DETAILS:EC.First Name,EC.Last Name,EC.Organization,E.Name,EC.City,EC.Address,EC.State,EC.Zip Code,EC.Email,E.Name:(ET=Customers):{0} {1}|{2}|{3}|{4}|{5}|{6}|{7}|{8}|{9}}

Here is our report now:

:exclamation: If you get an error message, chances the column counts will be wrong (the 2nd most common mistake). Double check your header (table name), column header & report format columns.

Notice the Phone column. It is not in a very readable friendly format. Let’s fix that. We want the numbers to be displayed as (###) ###-####. To do this we are going to use [=F(TN(’{3}’),’(###) ###-####’)].

  • The [= ] brackets is going to SambaPOS that there is going to be a calculation/format that is going to be done.
  • The F(,‘(###) ###-####’) is letting SambaPOS that we are going to format to a specific format. Everything in between the single quotes is how it is going to be displayed.
  • The TN(‘xxx’) stands for “To Number”, it will convert what’s inside the '' to a number. Even though it looks like they are numbers, to SambaPOS they are a collection of characters, called a string. We need to tell Samba to treat the characters as numbers in order to do the formatting.

When formatting numbers, the F & TN, typically go hand-in-hand F(TN('<somenumber>'),'<format>')

This is our report:

[#Customers:1,1,1,1,1,1,1,1,1]
>Name|Organization|Phone|City|Address|State|Zip Code|Email|Primary
{REPORT ENTITY DETAILS:EC.First Name,EC.Last Name,EC.Organization,E.Name,EC.City,EC.Address,EC.State,EC.Zip Code,EC.Email,E.Name:(ET=Customers):{0} {1}|{2}|[=F(TN('{3}'),'(###) ###-####')]|{4}|{5}|{6}|{7}|{8}|{9}}

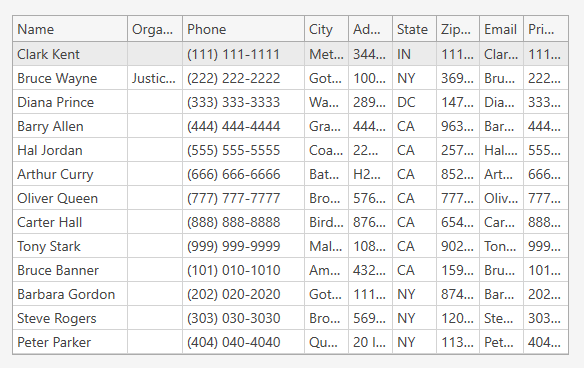
And here is how it looks:
kRyHEOcp57
The phone column looks much better. Notice I have a duplicate E.Name report field as the last column. This is because Primary field I am using is a phone number, stored in the database as ########## (10 numbered characters). We changed the format of the first E.Name report field (Phone column) to (###) ###-###. Later, we will need the original format to search for tickets. If we used the formatted version of the phone number, SambaPOS will not be able to find it because it contains parenthesis, spaces and a dash.

:exclamation: You will only need to do this if you use a phone number as a primary field and you change the format. If you a name field that contains both first and last name, you will not need to duplicate the E.Name report field & column.

Save the report.

Entity Screen

Navigate to Manage->Entities->Entity Screens->Add Entity Screen (right side of the screen)

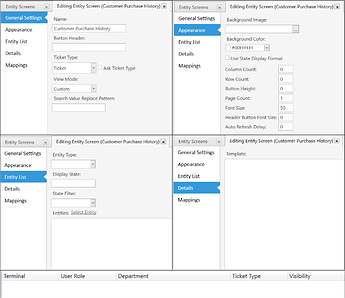
Name: Customer Purchase History
Button Header: (blank)
Ticket Type: (your default ticket)
View Mode: Custom
Search Value Replacement Pattern: (blank)
Appearance tab (no changes)
Entity List tab (no changes)
Details tab (no changes)
Mappings tab (none)

Now that we have a new screen, we have to be able to navigate to it. Manage->Automation->Automation Commands->Add Automation Command (right side of screen).

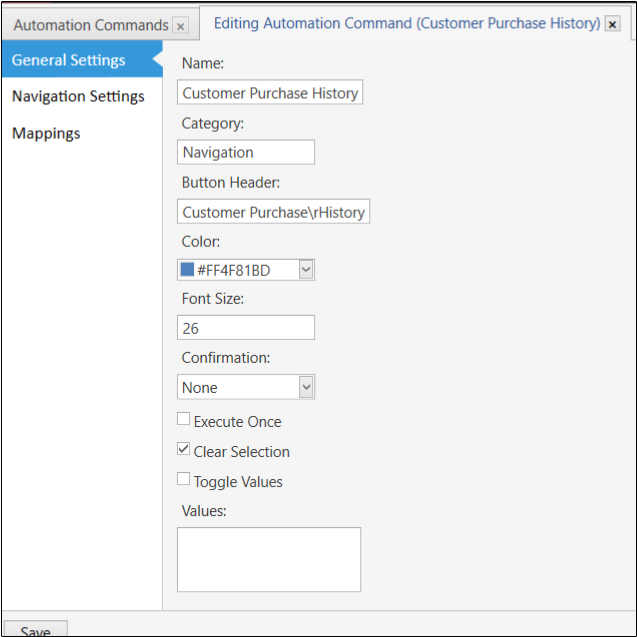
General Settings tab
Name: Customer Purchase History
Category: Navigation
Button Header: Customer Purchase\rScreen
Color: #FF4F81BD (or your choice)
Font Size: 26
Confirmation: None
Execute Once: unchecked
Clear Selection: checked
Toggle Values: unchecked
Values: (blank)
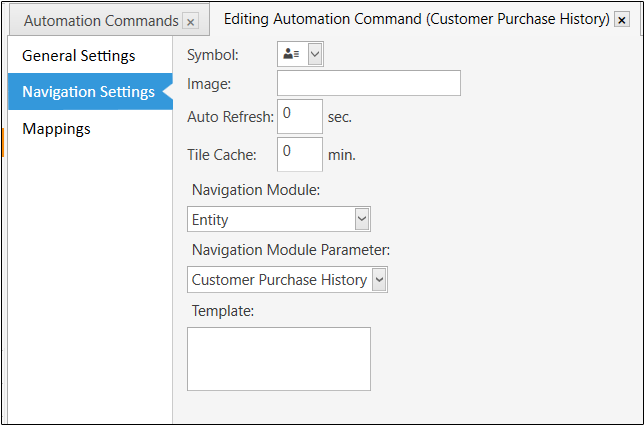
Navigation Settings tab
Symbol: (choice)
Image: (blank)
Auto Refresh: 0
Tile Cache: 0
Navigation Module: Entity
Navigation Module Parameters: Customer Purchase History
Template: (blank)
Mappings tab
Mappings: * * * * * * Display on Navigation

Drawing 4
Drawing 5

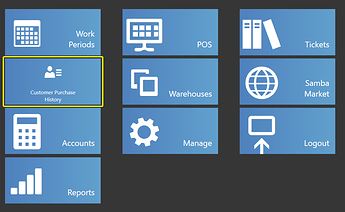
You should have tile on the navigation screen.


Clicking on the tile should brink you to a blank entity screen.

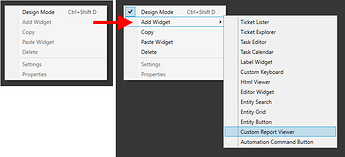
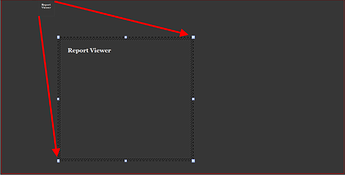
Right click anywhere in the black box. A pop will appear, click on “Design Mode”. Right click again, the box will appear again with option available. Click on “Add Widget”, then “Custom Report Viewer”.


A rectangle box will appear in the upper left hand corner of the screen. Click on the box to move it and resize to it fills roughly the left half of the screen and about 3/4 of the lower screen.

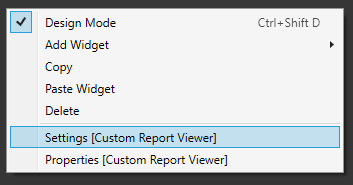
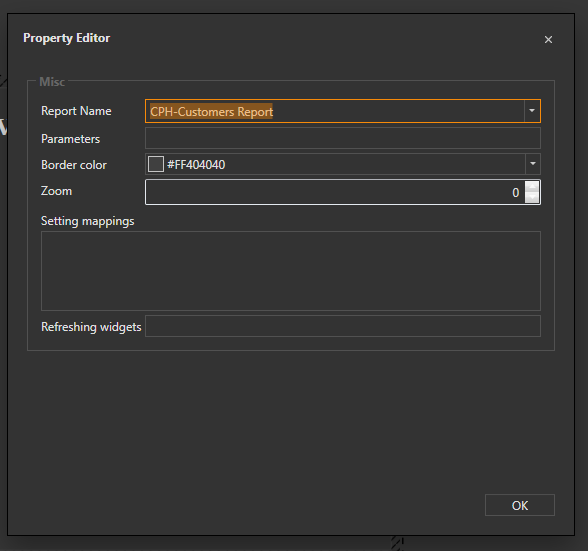
While the box is still selected, right click on the border or outside the border, then select “Settings [Custom Report Viewer]”.
orbr3IPNlt
In the “Report Name” field select the “CPH-Customers Report”
XGgTfbI7EL
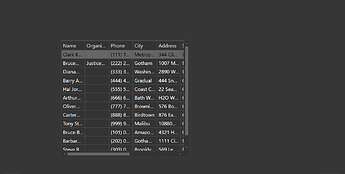
Click on the OK button. Right click again anywhere outside the report and select “Design Mode” to exit the Design Mode. Our report should appear:

Right now it is not very pretty…but we are still working on it.

Lets take a look at the desired results:


As you can see we have 4 main sections: Customer Details, Customer List/Search, Date Filter & Ticket/Orders Section. Right now our Customer List/Search has allot of information that makes the screen look clutter. We want to have just the basic information showing in the Customer List/Search, but also want to show more detailed information when we select a customer, that is where we will use the Customer Details section.

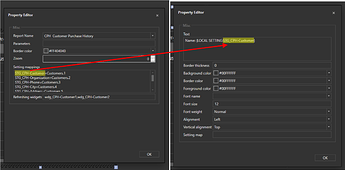
Let go back into Design Mode (clicking outside the report viewer section), select the Report Viewer Widget and go to Settings [Custom Report Viewer]. In the Settings mappings section we are going to put:

STG_CPH-Customer=Customers.1

Let’s break this line down to understand what it means. The first section ( STG_CPH-Customer ) is a name we are going to use a setting which SambaPOS can quickly access (or think of it as cache or memory). The name can be anything, as long as it is unique from other names. The equals ( = ) a separator. Customers is the table name…not the Report Name. This part of the report:
[#Customers:1,1,1,1,1,1,1,1,1]
The last part ( .1 ) is the column that will be used to get the setting information.
The proper syntax for this is:

<setting name>=<table name>.<column number>

To access this setting we use {LOCAL SETTING:<setting name>}. We will be doing that later.

Let’s fill in the rest of the settings:

STG_CPH-Organization=Customers.2
STG_CPH-Phone=Customers.3
STG_CPH-City=Customers.4
STG_CPH-Address=Customers.5
STG_CPH-State=Customers.6
STG_CPH-Zip Code=Customers.7
STG_CPH-Email=Customers.8
STG_CPH-Primary=Customers.9

As long as we are here lets fill in the “Refreshing widgets” field with:

wdg_CPH-Customer1,wdg_CPH-Customer2

These names can be anything. Refreshing widgets field will automatically refresh when a change has happened within the report widget.
Click OK to close this dialog box.
Create a “Label Widget”, move it above the Report Viewer and size it to the left half of the report widget. Go to the Properties [Label Widget], in the name field put the first name we used in the Refreshing Widget section wdg_CPH-Customer1. Click OK then open up the settings. In the Text section, lets put:

Name: {LOCAL SETTING:STG_CPH-Customer}


We are getting the settings name from the Settings mappings from the Custom Report Viewer Widget.

Click OK and exit Design Mode. Lets test it out. Click on a row in the report and arrow up & down or click different rows in the report. You should see the label widget automatically change as you change rows. If your not seeing any names or names changing, double check the Refreshing Widgets names, Label Widget name and the Text field for proper spelling.

Right about now you should be getting a good feeling!

Let’s go back into design mode and edit the text field of the label widget. Let’s delete what is there and replace it with this:

Customer:       <bold>{LOCAL SETTING:STG_CPH-Customer}</bold>
[= '{LOCAL SETTING:STG_CPH-Organization}' == '' ? '' : 'Organization:  <bold>{LOCAL SETTING:STG_CPH-Organization}</bold>']
Phone:            <bold>{LOCAL SETTING:STG_CPH-Phone}</bold>

Notice the second line. [= '{LOCAL SETTING:STG_CPH-Organization}' == '' ? '' : 'Organization: <bold>{LOCAL SETTING:STG_CPH-Organization}</bold>']
This is called Ternary Expression. Used as “If true” do this, “If false” do that. The first part, the condition, ( '{LOCAL SETTING:STG_CPH-Organization}' == '' ) is testing the setting to see if the setting is empty (empty defined as 2 single quotes next to each other-no space). When scrolling through the customer list, if a column is empty, the setting will also be empty. The ? ends the condition and starts the True statement. Since when a setting is empty we don’t want to display anything, we will put 2 single quotes again, meaning-do nothing. The colon separates the True/False section. Since we want to show something when the condition is false we are going to put 'Organization: <bold>{LOCAL SETTING:STG_CPH-Organization}</bold>', this will display the Organization setting.

Lets add another Label widget, resize & move it to the left of the first label widet, name it wdg_CPH-Customer2, in the Text field lets put:

Address: <bold>{LOCAL SETTING:STG_CPH-Address}
{LOCAL SETTING:STG_CPH-City} {LOCAL SETTING:STG_CPH-State} {LOCAL SETTING:STG_CPH-Zip Code}</bold>
Email: <bold>{LOCAL SETTING:STG_CPH-Email}</bold>

Exit Design Mode and lets make sure everything is working.

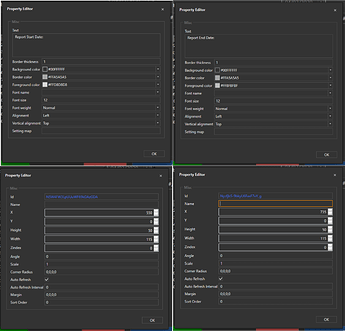
Once everything is working, lets start working on the other half of this screen. Enter back into Design Mode. Add 2 more Label Widgets and enter these setting.

Properties:

Field 1st Label 2nd Label
Name: (blank) (blank)
X: 550 735
Y: 0 0
Height: 50 50
Width: 115 115
Zindex: 0 0

Settings

Field 1st Label 2nd Label
Text: Report Start Date: Report End Date:
Border thickness: 1 1
Background color: #00FFFFFF #00FFFFFF
Border color: #FFA5A5A5 #FFA5A5A5
Foreground color: #FFD8D8D8 #FFD8D8D8

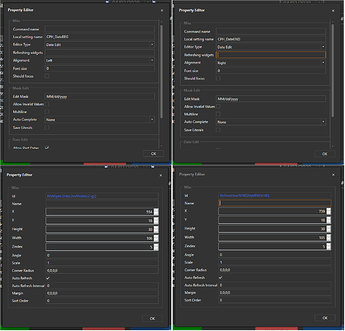
Date picking widgets

Now we need to add 2 Editor widgets.

Properties

Field 1st Editor 2nd Editor
Name: (blank) (blank)
X: 554 739
Y: 18 18
Height: 30 30
Width: 106 105
Zindex: 5 5

Settings

Field 1st Editor 2nd Editor
Command name: (blank) (blank)
Local setting name: CPH_DateBEG CPH_DateEND
Editor Type: Date Edit Date Edit
Refreshing widgets: (blank) (blank)
Alignment: Left Right
Font size: 0 0
Should focus: (unchecked) (unchecked)
*Edit Mask: MM/dd/yyyy MM/dd/yyyy

* Edit mask is used to convert the date format into Month/day/year. Your regional setting may be different.

Let exit design mode and create the last the report.

Report (2 of 2): Customer Purchase History

Report Name: CPH-Customer Purchase History
Page Size: 500
Display in Report Explorer: (unchecked)
Visual Printing: (unchecked)

Template:

[#Customers Purchase History:1,1,1,1,1]
>Date/Qty x Items|Ticket #/Price|Tkt Type/Ext|Tkt Total|Ticket ID
@{REPORT TICKET DETAILS:T.TicketNumber:(TEN.Customers={LOCAL SETTING:STG_CPH-Primary})::,}
{REPORT TICKET DETAILS:T.Date,T.TicketNumber,T.TicketType,T.TotalAmount,T.Id:T.TicketNumber="$1":[=FD('{0}','MM/dd/yyy - ddd')]|{1}|{2}|${3}|{4}}
{REPORT ORDER DETAILS:O.Quantity,O.MenuItemName,O.Price,O.ExactTotal,T.Id:T.TicketNumber="$1":     {0} x {1}|   $ {2}|   $ {3}||{4}}
[= '{REPORT TICKET DETAILS:T.TicketNumber:(TEN.Customers={LOCAL SETTING:STG_CPH-Primary})::,}' == '' ? '' : '    ------------------------------  |  ----------  |  ----------  |  ----------  |' ]
{REPORT TICKET DETAILS:T.ItemCount.sum,T.TicketAmount.count,T.TotalAmount.sum:(TEN.Customers={LOCAL SETTING:STG_CPH-Primary}):Items\: [=F('{0}','0')]    Ticket Count\: {1}<!rn>Avg Itm\: $[=F(TN('{2}')/TN('{0}'),'0.00')]   Avg Tkt\: $[=F(TN('{2}')/TN('{1}'),'0.00')]|||Total\: $ {2}}

{REPORT TICKET DETAILS:EC.First Name,EC.Last Name,EC.Organization,EN.Customers.asc:(TEN.Customers={LOCAL SETTING:STG_CPH-Primary}):{0} {1}}
{REPORT TICKET DETAILS:EC.Organization.asc:(TEN.Customers={LOCAL SETTING:STG_CPH-Primary})}

Notice the 3rd line of this report that starts with a @. This line will create a parameter. A parameter will create a list that can be accessed later from within the report. We then access the parameter using $1. If we had more than 1 parameter, we would use $2, $3 etc.The parameter we will be creating is a list of Ticket Numbers (T.TicketNumber) where the customers we have selected on our customers report ( (TEN.Customers={LOCAL SETTING:STG_CPH-Primary}) ) are attached to the tickets.

The last column on this report (T.Id) we will use to display and/or print the selected ticket/order.

The last 2 reports lines are used as a reference of the customer and/or organization the report was ran for if we select a different customer on the Customers report. Both reports are optional.

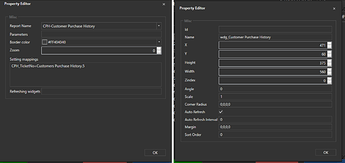
Lets add this report to the Customer Purchase History.

Properties

Name: wdg_Customer Purchase History
X: 471
Y: 60
Height: 375
Weight: 560
Zindex: 0

Settings

Report Name: CPH-Customer Purchase History
Parameters: (blank)
Border Color: #FF404040
Zoom: 0
Settings mapping: CPH_TicketNo=Customers Purchase History.5

Actions

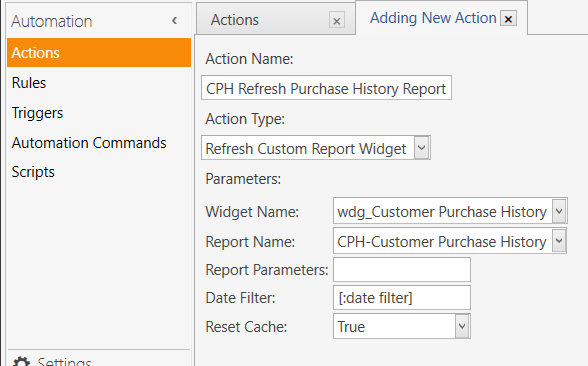
CPH Refresh Purchase History Report (1 of 4)

Action Name: CPH Refresh Purchase History Report
Action Type: Refresh Custom Report Widget
Widget Name: wdg_Customer Purchase History
Report Name: CPH-Customer Purchase History
Report Parameters: (blank)
Date Filter: [:date filter]
Reset Cache: True

jaT0Pgy7UD

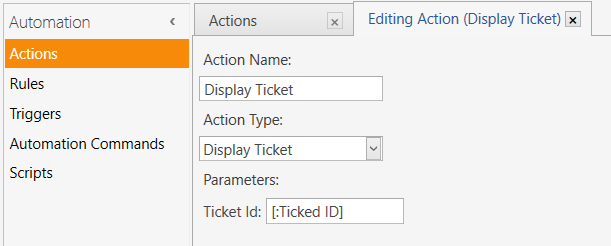
Display Ticket (2 of 4)

Action Name: Display Ticket
Action Type: Display Ticket
Ticket Id: [:Ticket ID]

rXsJekIh7P

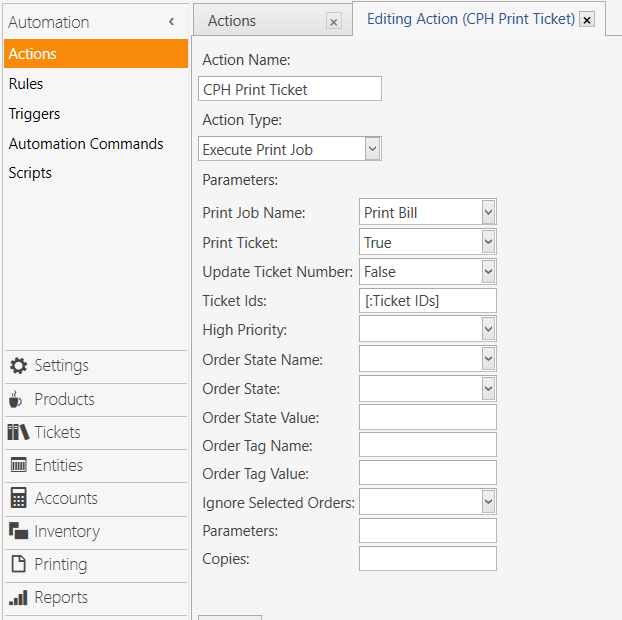
CPH Print Ticket (3 of 4)

Action Name: CPH Print Ticket
Action Type: Execute Print Job
Print Job Name: Print Bill
Print Ticket: True
Update Ticket Number: Flase
Ticket Ids: [:Ticket IDs]
Hight Priority: (blank)
Order State Name: (blank)
Order State: (blank)
Order State Value: (blank)
Order Tag Name: (blank)
Order Tag Value: (blank)
Ignore Selected Orders: (blank)
Parameters: (blank)
Copies: (blank)

q991TGN9l7

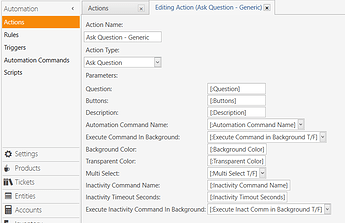
Ask Question - Generic (4 of 4)

Action Name: Ask Question - Generic
Action Type: Ask Question
Question: [:Question]
Buttons: [:Buttons]
Description: [:Description]
Automation Command Name: [:Automation Command Name]
Execute Command In Background: [:Execute Command In Background T/F]
Background Color: [:Background Color]
Transparent Color: [:Transparent Color]
Multi Select: [:Multi Select T/F]
Inactivity Command Name: [:Inactivity Command Name]
Inactivity Timeout Seconds: [:Inactivity Timeout Seconds]
Execute Inactivity Command In Background: [:Execute Inact Comm in Background T/F]

Rules

CPH-Run Purchase History Report (1 of 3)

Rule Name: CPH-Run Purchase History Report
Event Name: Automation Command Executed

Custom Constraint List

Execute Rule If: Matches
Automation Command Name Equals CPH_Purchase History Report

---- Actions ----

Action (1 of 3): CPH Refresh Purchase History Report
Constraint: ‘{LOCAL SETTING:CPH_DateBEG}’ != ‘’ && ‘{LOCAL SETTING:CPH_DateEND}’ != ‘’
date filter {LOCAL SETTING:CPH_DateBEG} <> {LOCAL SETTING:CPH_DateEND}

* To add a second of the same action you will need to right click in the left box and select “Display All Values” option.

Action (2 of 3): CPH Refresh Purchase History Report
Constraint: ‘{LOCAL SETTING:CPH_DateBEG}’ != ‘’ && ‘{LOCAL SETTING:CPH_DateEND}’ != ‘’
date filter {LOCAL SETTING:CPH_DateBEG} <> {LOCAL SETTING:CPH_DateEND}
Action (3 of 3): Ask Question - Generic
Constraint: ‘{LOCAL SETTING:CPH_DateBEG}’ == ‘’
Question You are running a report dating back to the start of the system.\r\r This may take a while to complete.</bold>\r <bold>Continue?</bold>
Buttons Yes=Yes,No=No
Description Yes = Sit back and wait.\rNo = Fill in Start & End dates.
Automation Command Name CPH_Puchase History Report2
Execute Command In Background T/F (blank)
Background Color Orange (or choice)
Transparent Color (blank)
Multi Select T/F (blank)
Inactivity Command Name (blank)
Inactivity Timeout Seconds (blank)
Execute Inact Comm in Background T/F (blank)

What's happing

1st Action The contraint in the first action is going to check to see if the begining and end dates have been set. If both conditions are true, action will use the begining and end dates to run the report
2nd Action The contraint in the second action is going to check to see if the begining date is set and the ending date is blank. If both conditions are ture, the action will use the begining date and use the current date for the end date.
3rd Action The constraint in the third action is going to check to see if begining date is empty. If true, a pop-up message will appear to alert the user that the report may take some time to run. SambaPOS will appear to freeze while it generates the report for databases that have a high ticket count. This popup will also give the user a change to set begining date.

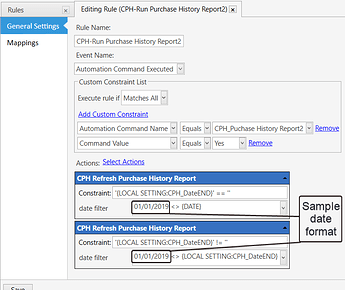
CPH-Run Purchase History Report2 (2 of 3)

Rule Name: CPH-Run Purchase History Report2
Event Name: Automation Command Executed

Custom Constraint List

Execute Rule If: Matches All
Automation Command Name Equals CPH-Run Purchase History Report2
Command Value Equals Yes

---- Actions ----

Action (1 of 2): CPH Refresh Purchase History Report
Constraint: ‘{LOCAL SETTING:CPH_DateEND}’ == ‘’
date filter (enter the date of your ticket # 1)** <> {DATE}

** You will need to enter the date you started using SambaPOS. The report will use this date to run the report. You can find the date in Tickets and rolling back the date until you see ticket #1, or the lowest number under the Number column.

Action (2 of 2): CPH Refresh Purchase History Report
Constraint: ‘{LOCAL SETTING:CPH_DateEND}’ != ‘’
date filter (enter the date of your ticket # 1)** <> {LOCAL SETTING:CPH_DateEND}

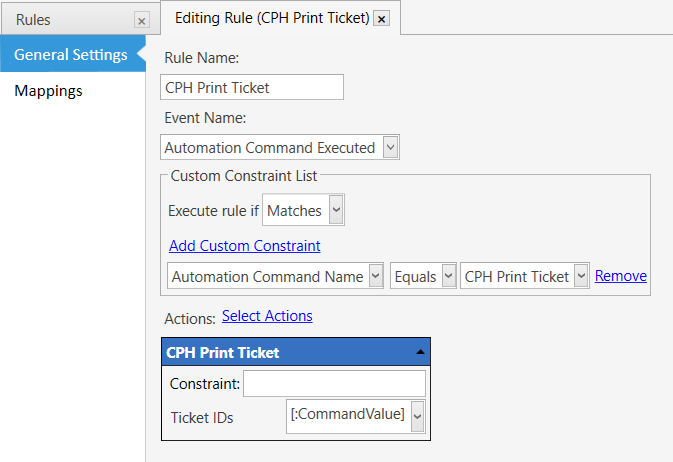
CPH Print Ticket (3 of 3)

Rule Name: CPH Print Ticket
Event Name: Automation Command Executed

Custom Constraint List

Execute Rule If: Matches
Automation Command Name Equals CPH Print Ticket

---- Actions ----

Action (1 of 1): CPH Refresh Purchase History Report
Constraint: (blank)
Ticket IDs [:CommandValue]

ZUy66Tn3Nw

Posts: 3

Participants: 1

Read full topic

Pie Report Deliverers

Update rule when changing action name

$
0
0

@Memo wrote:

Adding this script will automatically update the database at the appropriate location so one doesn’t need to go and manually re-add an action to a rule in the event of an action name change.

Execute this script inside your favourite IDE (like SQL Server Management Studio)
Make sure that SambaPOS5 in USE SambaPOS5 is your correct database.

/* Update ActionContainers on Action Name Change */

USE SambaPOS5

IF OBJECT_ID('dbo.trg_app_actions_update') IS NOT NULL
  DROP TRIGGER dbo.trg_app_actions_update;
GO

CREATE TRIGGER trg_app_actions_update
  ON AppActions
AFTER UPDATE
AS
  BEGIN
    DECLARE @ActionID   INT
    DECLARE @ActionName NVARCHAR(50)

    SELECT @ActionID    = Id FROM INSERTED;
    SELECT @ActionName  = Name FROM INSERTED;

    UPDATE ActionContainers
    SET Name = @ActionName
    WHERE AppActionId = @ActionID;
  END;

Or, unzip the following file place the script in %USERPROFILE%\Documents\SambaPOS5\Database Tasks (unless installed in a location other than default).

[CBL]auto_trg_update_action_containers.zip (489 Bytes)

Go to Management -> Settings -> Database Tools and select auto_trg_update_action_containers.sql then select “Execute Task”.

There will be an automatic backup.

Now when changing an action name instead of seeing things like this:

rules

you’ll see no popups or this after testing rules:

2020-05-01_09;29_1588346991_Samba.Presentation

Posts: 3

Participants: 2

Read full topic

Working With UK Post Code


Keeping Track of Occupancy

$
0
0

With restaurants opening up with some capacity restrictions, I thought I would whip up a simple head count tracker using adding and subtracting, as guests enter and leave.

Automation Commands (1 of 1)

Name: Occupancy
Category: (blank)
Button Header: Occupancy\r{SETTING:Occupancy}
Color: #FFAA3A37 (or your choice)
Font Size: 26
Confirmation: None
Values: (blank)
Mappings Tab
Mappings: * * * * * * Ticket

:information_source: You may want to sort Automation Commands to have this one on top.

Actions

1 of 2

Action Name: Occupancy-Automation command
Action Type: Execute Automation Command
Automation Command Name: Occupancy2
Command Value: [:command value]
Background: (blank)
Delay: (blank)

gFBkIQsgF9

2 of 2

Action Name: Occupancy-Update Program Setting
Action Type: Update Program Setting
Setting Name: Occupancy
Setting Value: [:setting value]
Update Type: Update
Is Local: False

C0YsRnaqvo

##Rules
1 of 2

Rue Name: Occupancy Step 1
Event Name: Automation Command Executed
Execute Rule if: Matches
Automation Command Name: Equals Occupancy
Action: Occupancy-Automation Command
Constraint: (blank)
command value: [?Adjust Occupancy;;;OC;"+1","+2","+3","","-1","-2","-3"|"+4","+5","+6","","-4","-5","-6"|"+7","+8","+9",,"-7","-8","-9"]

Rule 2 of 2

Rue Name: Occupancy Step 2
Event Name: Automation Command Executed
Execute Rule if: Matches
Automation Command Name: Equals Occupancy2
Action: Occupancy-Update Program Setting
Constraint: (blank)
setting value: [=TN('{SETTING:Occupancy}')+([:CommandValue])] ]

117J6A4ooJ

Enjoy!!!

1 post - 1 participant

Read full topic

Show Message action...A helpful little tool for Debugging

$
0
0

:warning: It is not recommended to try this on a production (one used for everyday business) database. Use this on a practice machine/database or in Training Mode.
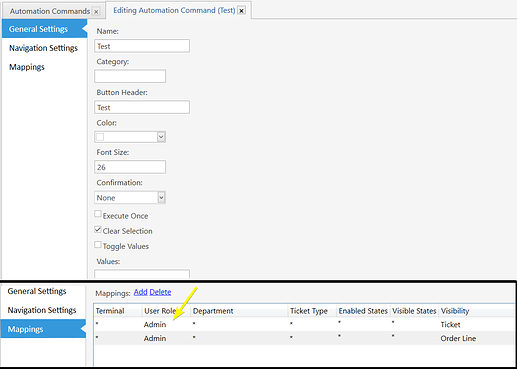
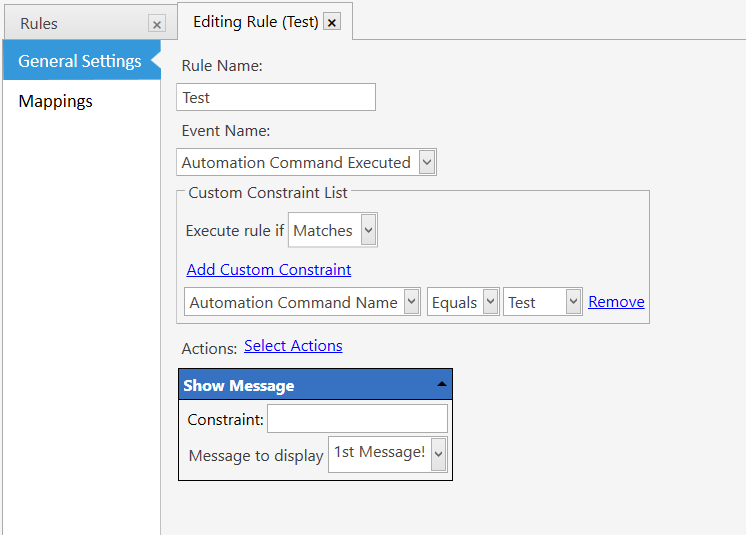
:warning: This will not break anything, but it can lead to annoying pop-ups.

When trying to come up with a new process or flow for your business it can be a little frustrating when things don’t go the way you planned and you want to see what is happening behind the screen. SambaPOS has a little tool that will help you test and/or see values that are being processed for a rule or action. That tool is the Show Message action.

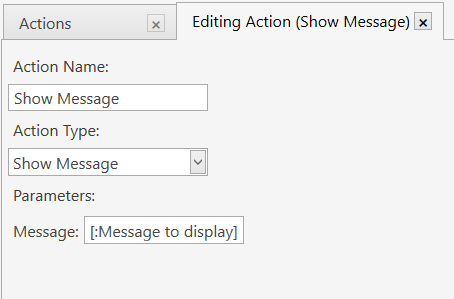
Let’s start this tutorial by making a Show Message action:

Manage->Automation->Actions ->Add Action

Action Name: Show Message
Action Type: Show Message
Parameters: [:Message to display]

Save Action.

7KMV4NcUSj

Now lets make a button so we can do some testing:
Manage->Automation->Automation Commands->Add Automation Command

Name: Test
Category: (blank)
Button Header: Test
All other settings: (leave as default)
Mappings: * Admin * * * * Ticket
* Admin * * * * Order Line

Save Automation Command.

–Note– We are mapping to Admin so that non-Admin users do not see the button.

Now lets put the 2 new items we created together in a Rule.
Manage->Automation->Rules->Add Rule

Rule Name: Test
Event Name: Automation Command Executed
Add Custom Constraint: Automation Command Name Equals Test
Select Actions: Show Message
After adding the action
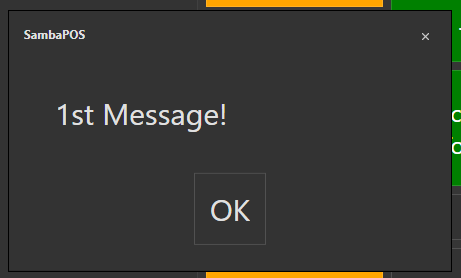
Message to display: 1st Message!

Save rule.

Now go to your POS screen. There should be a new button on the left of your screen with the word “Test” on it. When you press it a pop-up should appear with 1st Message!

oKKuKZINbh

If you want you can add an item to the ticket, highlight the item and you should see the Test button on Order Line screen. Pressing the button will show the same message. Cancel all items from the ticket and close the ticket.

Let’s head back to the Test rule and change the Message to display field.

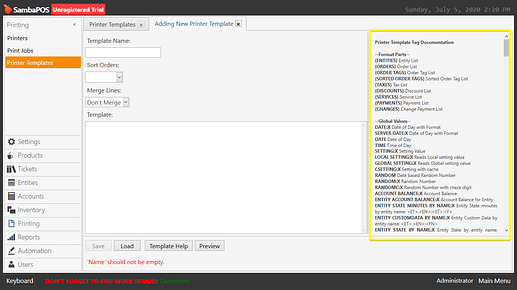
Almost all of the Printer Templates fields will work in the Message to display field
Manage->Printing->Printer Templates->Add Printer Template

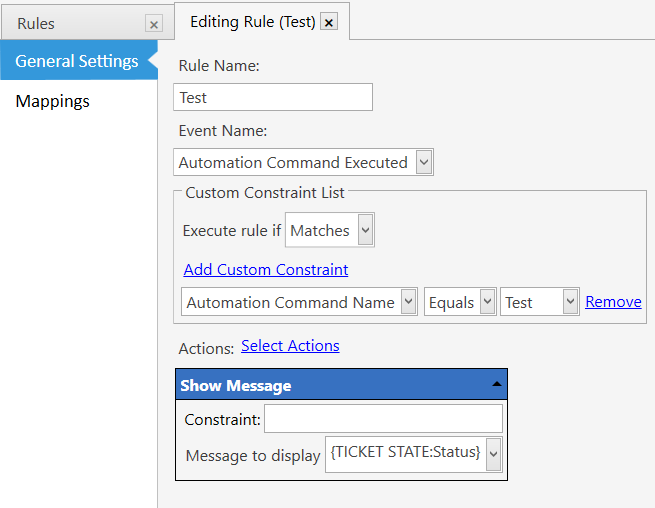
In the Message to display field lets put {TICKET STATE:Status}
93oDOtJo7I

Save the rule. And lets go back to the POS screen. Now press “Test” button.

…Hmmm, that is weird. Try pressing it again. Nothing happening, whats going on!!!
Lets add an item to the ticket.
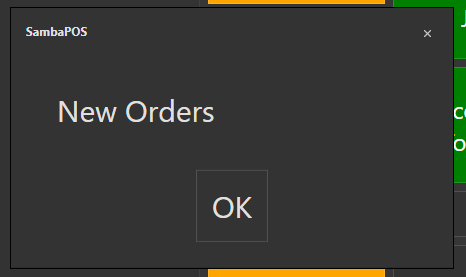
Now press the “Test” button. NOW it works! It should show “New Orders”
89DiJPeZIK|466x277, 75%T
What is going on, you ask? When we pressed the Test button, without any orders, the Ticket did not have any State. No State meant no information to display. When we added an order, the ticket now had a state of “New Orders” and that was printer template tag we used to display that information.

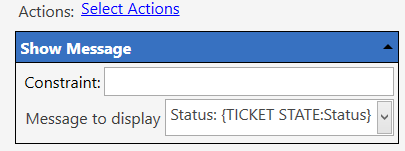
There is a way to force the Show Message action to always display when we want it to. Cancel all orders on the ticket and close the ticket. Head back to the Test rule. Now lets put a label in front of the {TICKET STATE:Status}. Lets put the word Status: . It should look like this: Status: {TICKET STATE:Status}
Q3hxCG6Sif
By putting a label in the Message to display field the Show Message action has something to show, regardless if the Printer Template Tag has information or not.

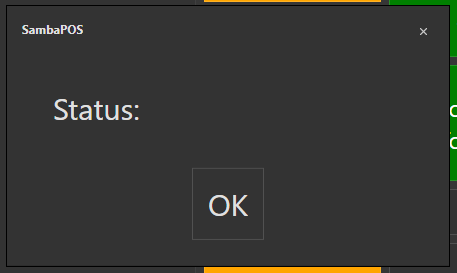
Now go back to the POS screen. Now when you press the Test button with an empty ticket. Now you will see a popup with just the word “Status:” on it.
OkDQtfCj9K
You can add an item to the ticket and press the Test button. Now it should read “Status: New Orders”.

The Show Message action is not limited to just an Automation Command button. It can also be added to any set of actions in any rule.

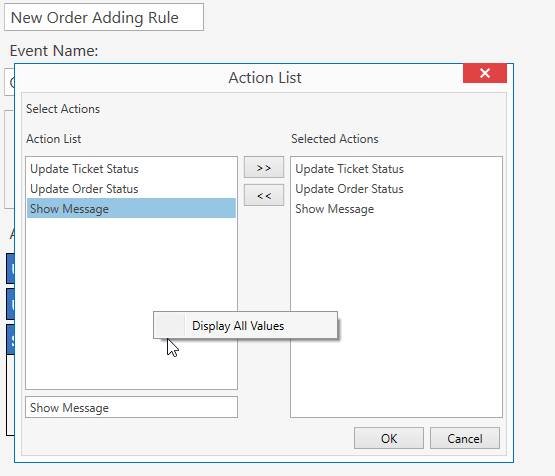
Let go back to all the rules list. In the list of rules, you should have an rule named New Order Adding Rule. Open the rule up, after clicking on Select Actions link, search for Show Message. Add that action but keep the dialog open. We want to add another Show Message action. To do that, we need to right click in the left box. A dialog will appear with the option “Display All Values”. Select that option and all the actions from the right will appear in the left box.
SMIxIsMbg2
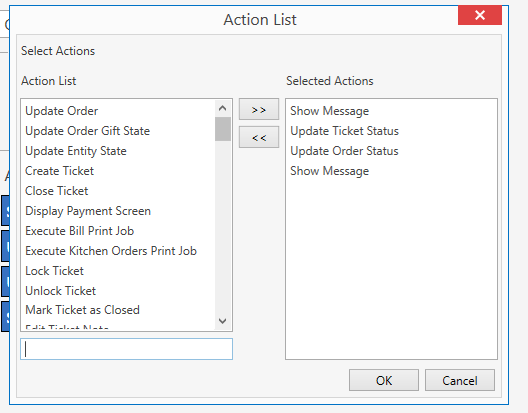
Select the Show Message action and add another one to the right. Click on 1 of the Show Messages from the right and drag it to the top.
LsnDaKrHbO
Click OK on the dialog.

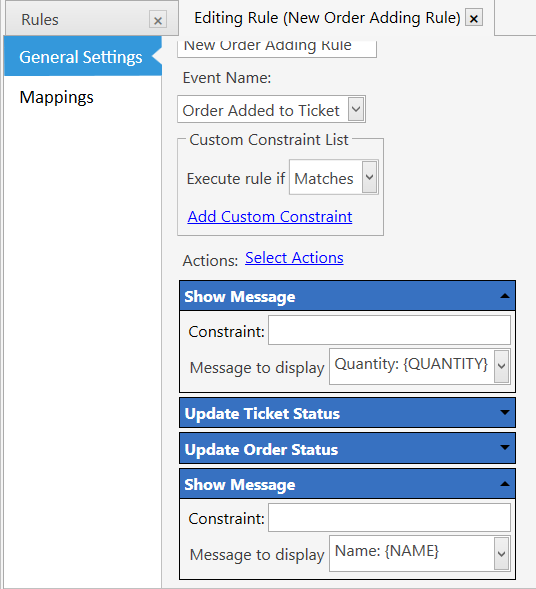
In the first Show Message action, in the Message to display field put Quantity: {QUANTITY}
In the last Show Message action, Message to display field put Name: {NAME}
SQ0e6wuAwL

Now go back to your POS screen. Add an item to the ticket. You will now be shown 2 popup dialogs every time you add an item to the ticket. One with the quantity that was added and another with the menu name that was added.

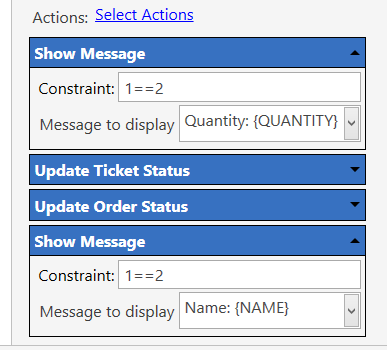
Let’s say that during your developing a new configuration you have a part working properly, but don’t want to the pop-ups to show any more. But you still might need them later. We can constrain them out of the rule so they will not fire. There are many ways to do this, the easiest I have found is to put 1==2 in the constraint field. Let’s try that in the above New Oder Adding Rule. Open the rule up and put 1==2 in both of the Show Message actions Constraints field.
8dWpAXdH1b
Now if you add an item to the ticket, the pop-ups no long appear. When you know everything is working correctly, you can remove the Show Message actions from your rules.

The Show Message action is not limited to Printer Templates. It can be use many other things, such as (but not limited to):

  • Checking Syntax’s equations/formulas
  • Checking Constraints
  • Command Values
  • Checking the manipulation of values
  • Reading information
  • Checking if a Rule is firing.
  • and the list goes on and on.

All though the Show Message does not solve problems, it’s a tool to find out what does work and what does not work.

Searching the forum will help you find information that you need to display in the Show Message action.

7 posts - 4 participants

Read full topic

Keeping $0 tickets open with product timers

$
0
0

Normally if you add $0 items or gift/void all items on the ticket, SambaPOS will considered it as settled once you close it and the table entity will be cleared. However, if you have guests that only order free items at first, such as water, you will want to prevent this behavior.

Usually to workaround this, we use multiple states and automation. An alternative simple solution is to use product timers to keep $0 tickets open so you can continue to add more products to the ticket when your guests are ready to order.

1. Create product "Keep Ticket Open"
Products > Product List > Add Product
image

2. Add “Keep Ticket Open” product to your menu.
Products > Menu List > Menu > select Admin > Edit Category Products
image

3a. Create product timer "Keep Ticket Open Timer
Main Menu > Products > Product Timers > Add Product Timer
image

3b. Map this Product Timer to the product you created earlier

4. Allow zero priced orders for your ticket type.
Tickets > Ticket Types > select Ticket > check Allow Zero Priced Orders
Note: Your ticket type may be named differently.
image

5. Test it works
Note: You will need to tap Stop Timer then Close when you want to close out the ticket.
“Keep Ticket Open” product will also show up on printed tickets unfortunately.

7 posts - 3 participants

Read full topic

Deliverers Report

Selecting more than 1 address for the customer

The Feature of Defining and Selecting Multiple Addresses for Different Customers

Change Database Connection Tutorial

$
0
0

Description

Changing between databases on the fly without the need to restart SambaPOS with a push of a button. Had this request from a client (to check old reports, accounts etc) so decided to share it on the forum since there is no actual tutorial for this.

Requirements:

  1. SQL Server Express 2014 - 2017

  2. Custom Navigation Screen

  3. SambaPOS 5.3.0 (tested on it)

Tutorial:

Actions

Action - Change Database Connection

Name: Change Database Connection
Save To Local Settings: [:SaveToLocalSettings T/F]
user Pin: [:UserPIN]
Reset To Default Connection: [:ResetToDefaultConnection T/F]


Action - Logout User
image

Name: Logout User
Reset Cache: True
Logout Admin: True


Automation Commands

Automation Command - SQL Connection String

Name: SQL Connection String
Category: Navigation
Button Header: SQL String


Navigation Settings Template:
<size 46><sym></sym></size>

<size 48><bold>SQL String</bold></size>


Rules

Rule - SQL Connection String

Name: AMC SQL String
Event Name: Automation Command Executed
Custom Constraints: Execute rule if Matches
Automation Command Name Equals SQL Connection String

Actions:

Change Database Connection
Constraint:
String:

Data Source=DESKTOP-TFJ218C\SAMBAPOS; User Id=sa; Password=sambapos; Database=[?Database;;{REPORT SQL DETAILS:SELECT name FROM master.sys.databases WHERE database_id > 4 ORDER BY name:F.name::|};OCS;]

SaveToLocalSeetings T/F: True
User PIN:
ResetToDefaultConnection T/F:

Execute Automation Command
Constraint:
Command Name: Logout User


Rule - Logout User

Name: AMC Logout User
Event Name: Automation Command Executed
Custom Constraints: Execute rule if Matches
Automation Command Name Equals Logout User

Actions:

Logout User
Constraint:


Import File

Change SQL Connection Button.zip (1.3 KB)

1 post - 1 participant

Read full topic


Pre-Programmed Gift Card Setup with Promo Cards accounting

$
0
0

A little overview on how this gift card setup works.

This first animation will show the activation, adding a name/label to the card, changing the name/label, using the gift card for a sale.

  • To start the process simply scan a card from the POS screen. (I’m hand typing card number to keep things simple)
  • A pop up appears with the options to activate the gift card or cancel out.
  • If activating, a gift card menu item is automatically added to the ticket.
  • Followed by an automatic pop up asking for a price to load on the gift card.
  • After settling the ticket, another pop up will appear asking for a name/label (optional).

To use the gift card as a payment:

  • Add items to the ticket.
  • Scan the gift card.
  • Use Select Card to use a payment and automatically go to the settle screen.
  • At the settle screen, add the payment amount then select the Gift Card payment button.
  • A final pop up appears showing the balance left on the gift card. (pop up will disappear after 6 seconds-not demonstrated)

This animation shows activating 3 gift cards on the same ticket.
What’s a little different when activating multiple gift cards:

  • The Activating popup will only appear for the first gift card, any other, non activated, gift cards will not show the activating pop up.
  • Different gift cards can have different prices (amount to load on gift card).
  • After the sale, the name/label pop will not appear. (scanning each card after the sale can set the name/label field, if desired)
  • After the sale, I show that each gift card is activated with the proper amount.

Sometimes business want to give a gift to loyal customers, give away a promotional gift card, donate a gift card to charity, etc. This setup has the ability to create a free gift card and track the redemption (using the gift card as a payment) of the Promo Gift card (Promo Gift Card is what we will be calling these type of cards).

Scan Gift Cards is the same as before. For this animation I am going to show creating multiple Promo Gift Cards, the procedure is the same for creating 1 Promo Gift Card. The only expectation, when creating 1 Promo Gift Card, you will be asked for a name/label.

  • After scanning the cards you want to create as Promo Gift Cards, select one of Gift Card items (no need to select all items). We need to access the Order Tag screen to show the “Create Free/Promo GC” button. This button is only available to Administrators and for Gift Card menu items.
  • After pressing the button, the Promo Gift Cards will be created and all Gift Card items will be removed from the ticket.


This next animation is using a Promo Gift Card as a payment. You will notice, there is no difference from a regular gift card. This is designed to keep things simple for the user. The only way to tell the difference between a regular (sold) Gift Card and a Promo Gift Card, is the pop up after scanning. A regular Gift Card will have a “Add Funds” button. A Promo Gift Card will not have that button. This is designed to Promo Gift Card Funds and Paid Gift Card funds separated.

Accounting Screens after transactions


GC Promo Card Funds has the 3 cards we created, totaling $50 ($15, $15 & $20) & the $2.25 that was used as Gift Card payment


This Account is used as a total that used a Promo Gift Card payment.


This screen is all the Gift Cards that we have (Promo & Paid) with their balances. If a Gift Card (Promo & Paid) have a zero balance, it will not show.


This is the transactions for gift card # GC2010


This is the holding account for Promo Gift Cards, funds that have not been redeemed.

Question: But what about reloading a gift card? What about selling non-gift card items and Gift Card items? What if you could Activate, Add funds and add regular menu items all to one ticket?
Answer:

  • Order doe not matter. I forgot to mix menu items and Gift Card items on the ticket.
Breakdown on what happened
GC # Beg Bal Added $ Ending Bal
GC2005 N/A $10 $10
GC2006 N/A $15 $15
GC2001 $8.50 $10 $18.50
GC2003 $20 $1.00 $21.00
GC2010 Promo GC Can not add funds
GC2008 N/A $35 $35

N/A = Not Activated

Gift Card Screen after transaction:


Gift Card account screen (GC2001), showing activation, Redemption & funds added.

8 posts - 2 participants

Read full topic

Basic Cash Shift Tracker

GloriaFood: To Intregrate or not To Integrate?

$
0
0

That is the question.

I have my first Gloria + Samba client and he seems set on keeping the POS and GloriaFood separate.

I guess that would be more straight forward for me but can Gloria use the same printer that Samba uses without issues when NOT integrated? Anyone using a printer not in the list of supported ones in the Gloria App?

If integrating, what is the best order of programming? Do you program Gloria and then take the products in through the integration? Otherwise it would seem you are doubling up the work programming the till and Gloria the same?

Thanks,

1 post - 1 participant

Read full topic

Per Order Report for QuickBooks

$
0
0

Been working on a report that my client can import into QuickBooks using a preset template.

Basically his template was setup as:

Product | Portion | Qty | Price | Total Amount | Exact Total | Upsizes (order tags extra $)

Was a bit complicated until I realized I can use OTP.<Order Tag Group Name> as I never used those. The reason O.ExactTotal doesnt work in this case because any order at any time can have a different Upsize and therefor O.ExactTotal repeats same product names in the report with different values where I needed a sum.

Soooo… Had to think outside of the box and here it is :slight_smile:

Report xps

[Item Sales:2,1,1,1,1,1,1]
>>Desc|Portion|Qty|Price|Total|ExactTotal|Upsizes
{REPORT ORDER DETAILS:O.MenuItemName,O.PortionName,O.Quantity.sum,O.Price,=[$3*$4],=[($3*$4+$7+$8+$9+$10+$11+$12)].desc,OTP.Sides.sum,OTP.Wing Sides.sum,OTP.Platter Sides.sum,OTP.Family x2 Sides.sum,OTP.Family x3 Sides.sum,OTP.Free Tag.sum,=[$7+$8+$9+$10+$11+$12]:(ODI=True):{0}|{1}|{2}|{3}|{4}|{5}|{12}}

CSV

[Item Sales:0]
Desc,Portion,Qty,Price,Total,ExactTotal,Upsizes
{REPORT ORDER DETAILS:O.MenuItemName,O.PortionName,O.Quantity.sum,O.Price,=[$3*$4],=[$3*$4+$7+$8+$9+$10+$11+$12],OTP.Sides.sum,OTP.Wing Sides.sum,OTP.Platter Sides.sum,OTP.Family x2 Sides.sum,OTP.Family x3 Sides.sum,OTP.Free Tag.sum,=[$7+$8+$9+$10+$11+$12]:(ODI=True):"{0}","{1}","{2}","{3}","{4}","{5}","{12}"}

image

1 post - 1 participant

Read full topic

Simple Shopping List using Tasks

$
0
0

Simple Shopping List using Tasks

For our shopping list we are going to need to go shopping for a few items from SambaPOS Endless Isles of Options Emporium

We are going to need:

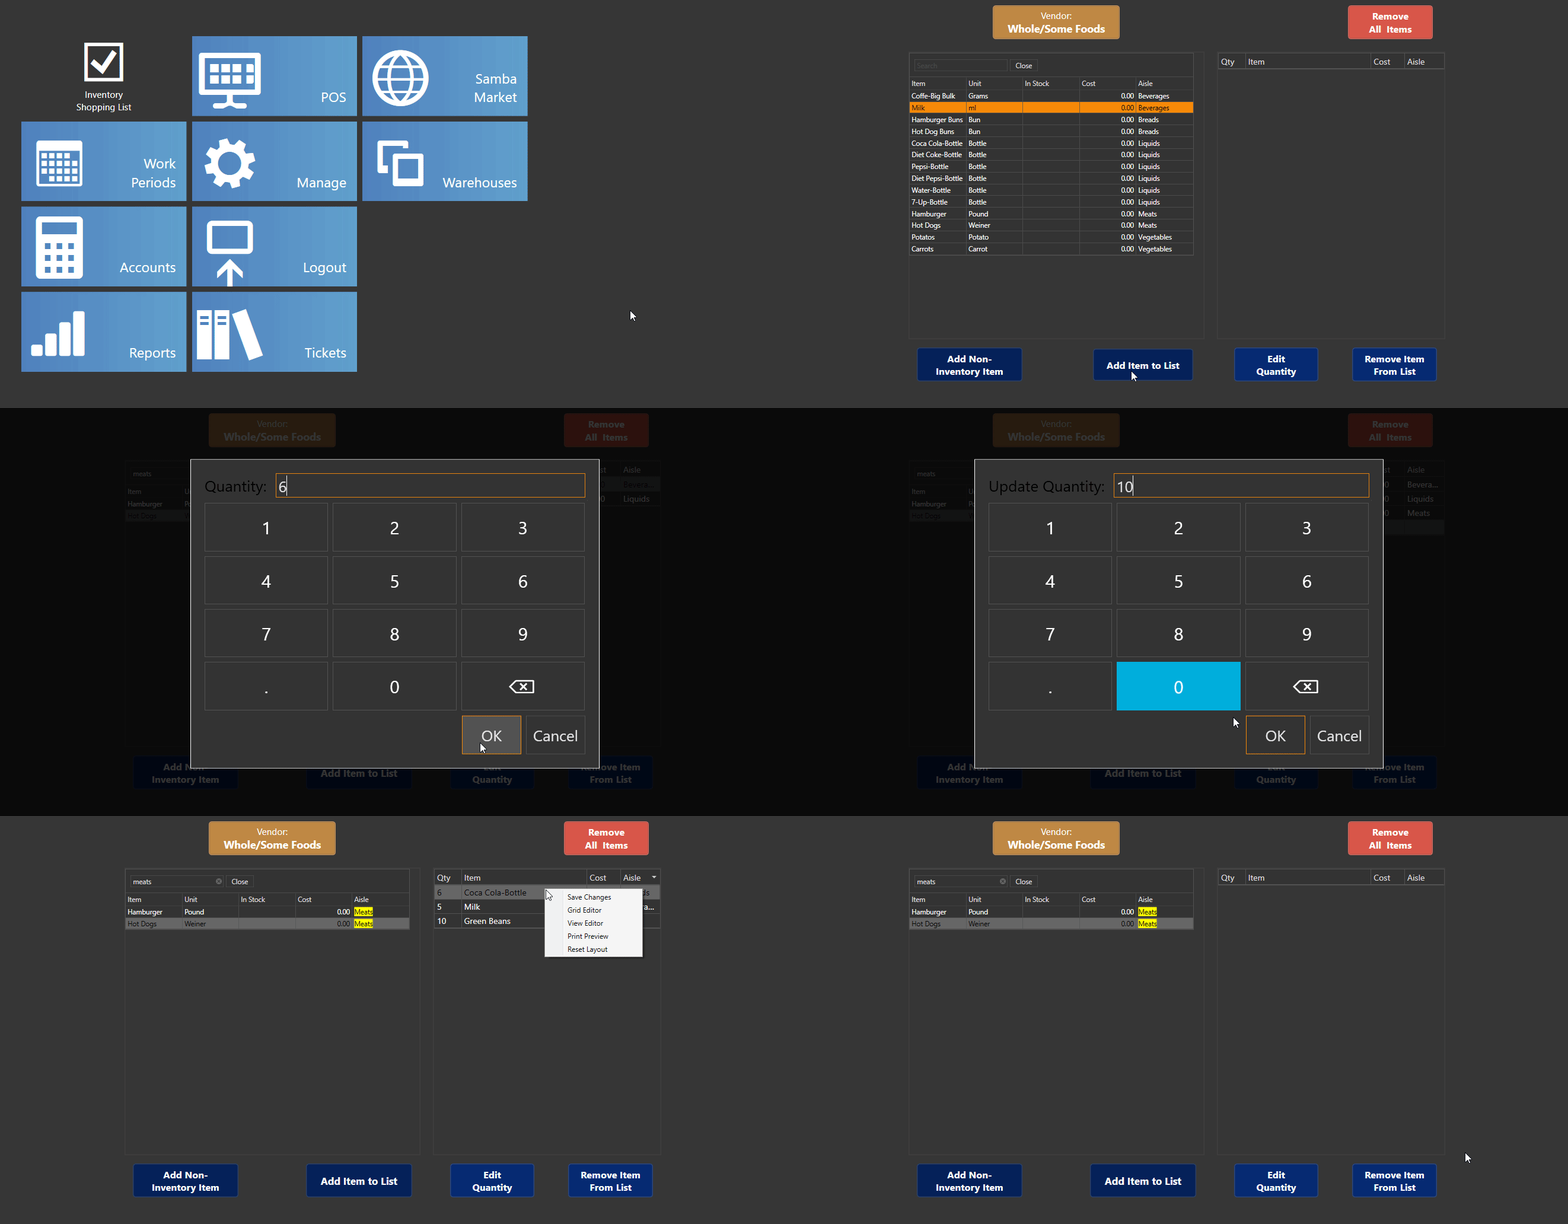
  • 1 Entity Screen
  • 8 Widgets
  • 1 Automation Command
  • 1 Task Type
  • 7 Rules
  • 8 Actions
  • 2 Reports

Optional:
Caffeinated Beverage of your choice

Step 1

  • Preheat caffeinated beverage to desired temperature.

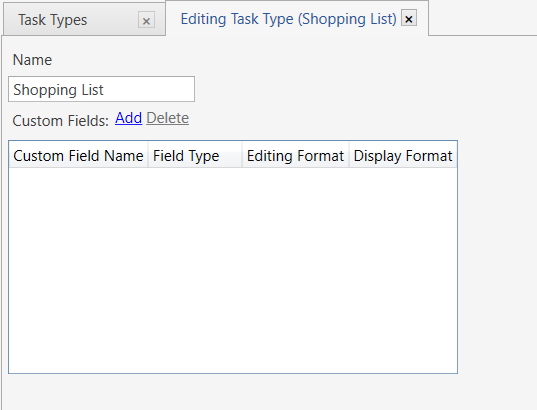
Task Type

Manage->Settings->Task Types->Add Task Type
Task Type 1 of 1

Name: Shopping List
Custom Fields: (blank)*

* We will be defining fields in Actions.

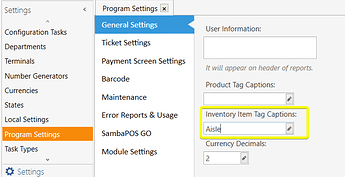
(Optional) Inventory Item Tag

Manage->Settings->Program Setting->General Settings:Inventory Item Tag Caption

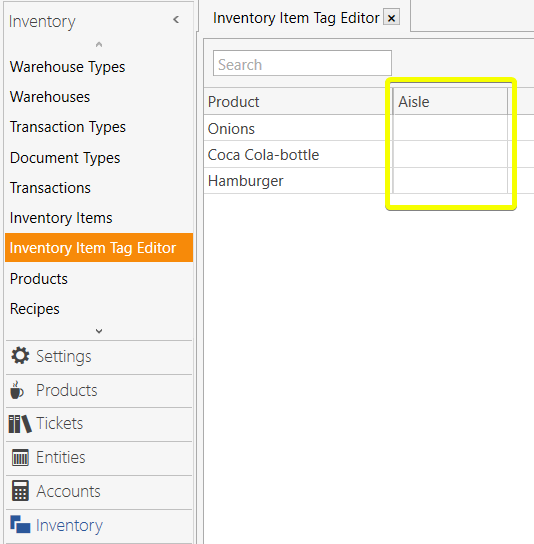
If you define Inventory Item Tag, it will be available thru the Inventory section:
Manage->Inventory->Inventory Items (Individually)
or batch through:
Manage->Inventory->Inventory Item Tag Editor
2VuPRIUUYB

Entity Screen

Manage->Entities->Entity Screens->Add Entity Screen

General Settings Tab
Name: Inventory Shopping List
Button Header: (blank)
Ticket Type: <your default Ticket Type>
View Mode: Custom
Search Value Replacement Pattern: (blank)
Appearance Tab, Entity List, Details & Mappings Tab
All other fields: Leave as default

Reports

Inventory Report (1 of 2)

Manage->Reports->Reports->Add Report
d9CCmZS21F

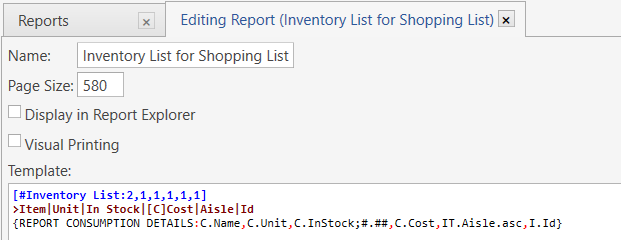
Name: Inventory List for Shopping List
Page Size: 580 (your size may vary)
Display in Report Explorer: unchecked
Visual Printing: unchecked
Template: (see below)

The first report we need is a list of inventory. In addition to a list of inventory we can also add additional fields to con-inside with inventory list (example cost, warehouse, groupcode, etc). It is a good idea to give some thought to what fields would best fit your needs. I will try to provide enough information to design the system that best fits your needs.

A Normal report that is used with this tutorial looks this:

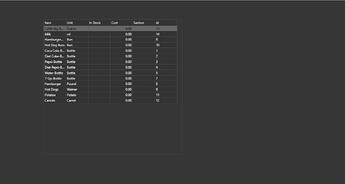
[Inventory List:2,1,1,1,1,1]
>Item|Unit|In Stock|[C]Cost|Aisle|Id
{REPORT CONSUMPTION DETAILS:C.Name,C.Unit,C.InStock;#.##,C.Cost,IT.Aisle.asc,I.Id}

However, SambaPOS a feature that we can use to make this (or any report) a powerful tool. To access this tool we need all we need to do is add a # before the report table name:

[#Inventory List:2,1,1,1,1,1]
>Item|Unit|In Stock|[C]Cost|Aisle|Id
{REPORT CONSUMPTION DETAILS:C.Name,C.Unit,C.InStock;#.##,C.Cost,IT.Aisle.asc,I.Id}

! Cost numbers will only show up when an item has been sold. That is how the Consumption report works.

This will turn our simple report into a Table View report. This is like a spreadsheet type grid, that we can select rows, search within report, adjust column sizes, sort columns while viewing, hide column and many other features.

You will notice that the field C.InStock;#.## looks different than a normal field tag. The ;#.## will format the field to show whole numbers and only decimal number if they are present. (Makes it easier to read)

! Note: Table View reports need to be saved once in order to view the results. Any changes to the report, after the initial save, can be viewed with Preview.
The Cost header is written as [C]Cost. The [C] will denote the column as Currency.

Other useful fields for Report
I.GroupCode GroupCode of Item
`I.Barcode’ Barcode of inventory product
IT.<inventory item tag> User created Item Tag

! Inventory Item Tag fields could be used to save the location of the item of the store you are shopping at, such as aisle, department or section.
Define the Inventory Item Tag column header at:

Manage->Settings->Program Settings:Inventory Item Tag Caption

Setting each item store location can set at:
Manage->Inventory->Inventory Item Tag Editor
or at:
Manage->Inventory->Inventory Items->select each individual item

Shopping list Report (2 0f 2)

We will be using Tasks to create our shopping list. To view the list, we will need to use a Task report. (Normally this report will need to be created after the fields have been defined in Actions.)

Name: Shopping List
Page Size: (blank)
Display in Report Explorer: unchecked
Visual Printing: unchecked

[#Shopping List:1,1,1,1,1]
>Qty|Item|Cost|Aisle|Identifier
{REPORT OPEN TASK DETAILS:TSC.Quantity,T.Name,TSC.Cost,TSC.Aisle,T.Identifier:(TST=Shopping List) && T.State="On List"}

If you have a different inventory report from above, you may need to create this report later or adjust the fields after creating the fields in Actions.

Automation Commands

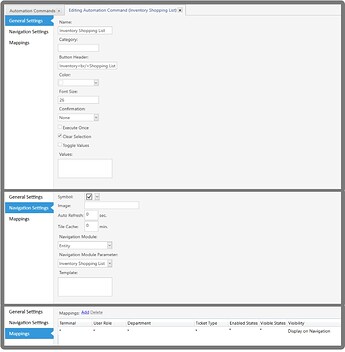
Manage->Automation->Automation Commands->Add Automation Command

General Settings Tab
Name: Inventory Shopping List
Category: (blank)
Button Header: Inventory<br/>Shopping List
Color: default
Font Size: default
Confirmation: default
Execute Once: unchecked
Clear Selection: checked
Toggle Values: unchecked
Values: (blank)
Navigation Settings Tab
Symbol: checkmark in square (or you choice)
Image: (blank)
Auto Refresh: (blank)
Title Cache: (blank)
Navigation Module: Entity
Navigation Module Parameters: Inventory Shopping List
Template: (blank)

Mappings Tab

Termial User Role Department Ticket Type Enabled State Visible State Visibility
* * * * * * Display on Navigation

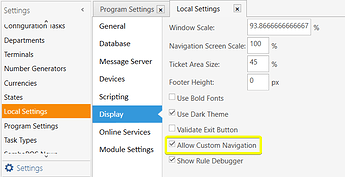
You may need to make sure Custom Navigation is enabled.
Manage->Settings->Local Settings->Display->Allow Custom Navigation

Also, your Navigation may only show the newly created Inventory Shopping List screen button. If it does, right click anywhere on the screen, an orange menu will appear from the bottom. Select “Manage”.

Navigate to:
Manage->Settings->Program Settings->Maintenance->Create Default Navigation Buttons


You should now have all your buttons back.

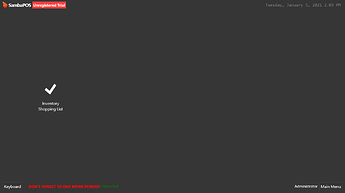
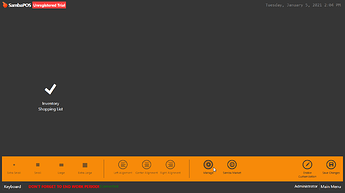
Inventory Shopping List Screen

Main Menu->Inventory Shopping List

Report Viewer Widget (1 of 2)

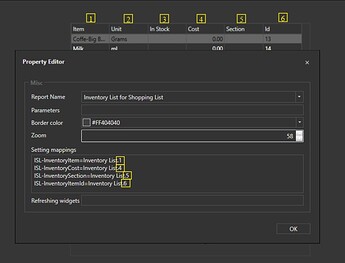
You should be presented with a blank screen. Right click anywhere on the screen and select “Design Mode” from the pop up menu. You will notice a red line outlined the screen. This is an indication that you are in Design Mode. Right click again and choose “Add Widget”->“Custom Report Viewer”. A small square will appear in the upper left hand screen with the text “Report Viewer”.
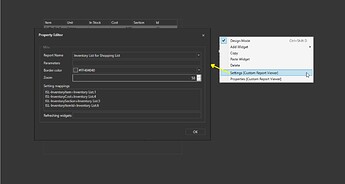
Right click again, and select “Settings [Custom Report Viewer]”

Shopping List Screen 4 of

Settings Editor
Report Name Inventory List for Shopping List
Parameters (blank)
Border Color default
Zoom 58
Settings mappings ISL-InventoryItem=Inventory List.1
ISL-InventoryCost=Inventory List.4
ISL-InventorySection=Inventory List.5
ISL-InventoryItemId=Inventory List.6
Settings Mappings Configuration Explanation

The format for this field is: <local program setting name>=<report table name>.<column number>

  • <local program setting> can be any name you come up with. To access the setting, use {LOCAL SETTING:<local program setting name>}
  • <report table name> is the name of the report table, not the report name, found within the square brackets.
  • <column number> is the column number counting from 1. Columns in table view reports can be re-arranged and hidden, the column numbers will always refer to the original column numbering.
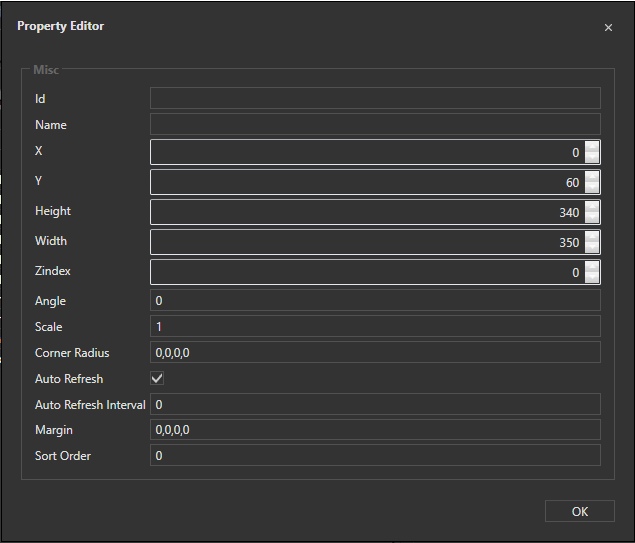
Properties Editor
Id {blank)
Name ISL_Report
X 0
Y 60
Height 340
Width 350
Zindex 0
Angle 0
Scale 1
Corner Radius 0,0,0,0
Auto Refresh checked
Auto Refresh Interval 0
Margin 0,0,0,0
Sort Order 0

Report Viewer Widget (2 of 2)

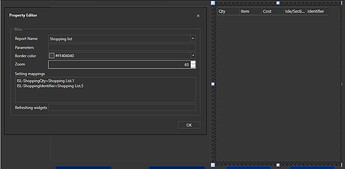
Shopping Report Widget 2 of 2

Create another Report Viewer Widget

Settings Editor
Report Name Shopping List
Parameters (blank)
Border Color default
Zooom 65
Settings mappings ISL-ShoppingQty=Shopping List.1
ISL-ShoppingIdentifier=Shopping List.5
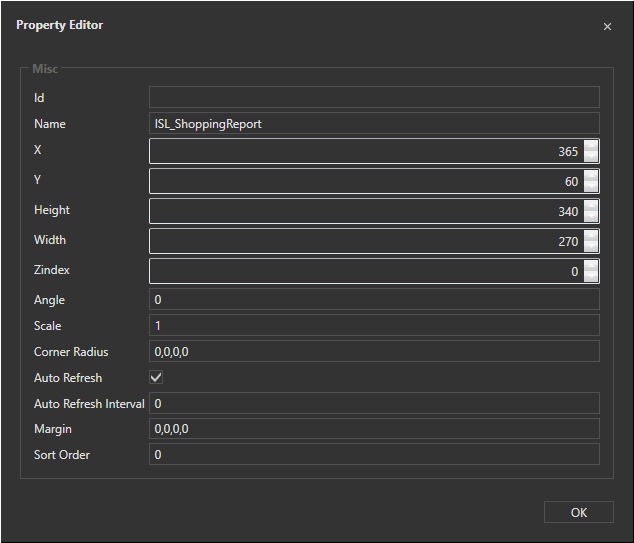
Properties Editor
Id {blank)
Name ISL-ShoppingReport
X 365
Y 60
Height 340
Width 270
Zindex 0
Angle 0
Scale 1
Corner Radius 0,0,0,0
Auto Refresh checked
Auto Refresh Interval 0
Margin 0,0,0,0
Sort Order 0

Automation Command Buttons

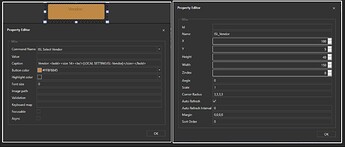
Vendor Button (1 of 6)

Settings Editor
Command Name ISL Select Vendor
Value (blank)
Caption Vendor:<bold><size 14><br/>{LOCAL SETTING:ISL-Vendor}</size></bold>
Button color #FFBF8845 (access ‘More Colors’ from th dropdown)
Highlight color default
Font size 0
Image path (blank)
Validation (blank)
Keyboard map (blank)
Focusable unchecked
Async unchecked
Properties Editor
Id (blank)
Name ISL_Vendor
X 115
Y 5
Height 40
Width 150
Zindex 0
Scale 1
Corner Radius 3,3,3,3
Auto Refresh checked
Auto Refresh Interval 0
Margin 0,0,0,0
Sort Order 0

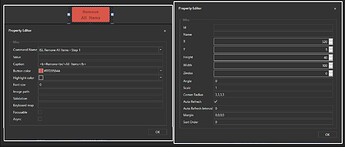
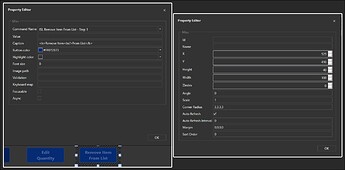
Remove All Items Button (2 of 6)

Settings Editor
Command Name ISL Remove All Items - Step 1
Value (blank)
Caption <b>Remove<br/>All Items</b>
Button color #FFD9564A
Highlight color default
Font size 0
Image path (blank)
Validation (blank)
Keyboard map (blank)
Focusable unchecked
Async unchecked
Properties Editor
Id (blank)
Name (blank)
X 520
Y 5
Height 40
Width 100
Zindex 0
Scale 1
Corner Radius 3,3,3,3
Auto Refresh checked
Auto Refresh Interval 0
Margin 0,0,0,0
Sort Order 0

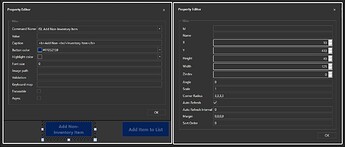
Add Non-Inventory Item (3 of 6)

Settings Editor
Command Name ISL Add Non-Inventory Item
Value (blank)
Caption <b>Add Non-<br/>Inventory Item</b>
Button color #FF052159
Highlight color default
Font size 0
Image path (blank)
Validation (blank)
Keyboard map (blank)
Focusable unchecked
Async unchecked
Properties Editor
Id (blank)
Name (blank)
X 10
Y 410
Height 40
Width 125
Zindex 0
Scale 1
Corner Radius 3,3,3,3
Auto Refresh checked
Auto Refresh Interval 0
Margin 0,0,0,0
Sort Order 0

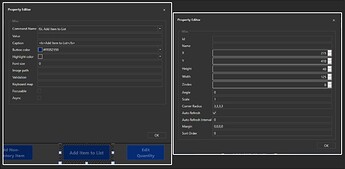
Add Item to List (4 of 6)

Settings Editor
Command Name ISL Add Item to List
Value (blank)
Caption <b>Add Item to List</b>
Button color #FF052159
Highlight color default
Font size 0
Image path (blank)
Validation (blank)
Keyboard map (blank)
Focusable unchecked
Async unchecked
Properties Editor
Id (blank)
Name (blank)
X 215
Y 410
Height 40
Width 125
Zindex 0
Scale 1
Corner Radius 3,3,3,3
Auto Refresh checked
Auto Refresh Interval 0
Margin 0,0,0,0
Sort Order 0

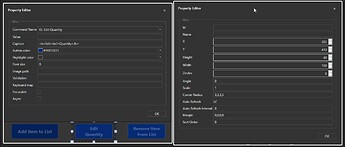
Edit Quantity (5 of 6)

Settings Editor
Command Name ISL Edit Quantity
Value (blank)
Caption <b>Edit<br/>Quantity</b>
Button color #FF072B73
Highlight color default
Font size 0
Image path (blank)
Validation (blank)
Keyboard map (blank)
Focusable unchecked
Async unchecked
Properties Editor
Id (blank)
Name (blank)
X 385
Y 410
Height 40
Width 100
Zindex 0
Scale 1
Corner Radius 3,3,3,3
Auto Refresh checked
Auto Refresh Interval 0
Margin 0,0,0,0
Sort Order 0

Remove Item From List (6 of 6)

Settings Editor
Command Name ISL Remove Item From List
Value (blank)
Caption <b>Remove Item<br/>From List</b>
Button color #FF072B73
Highlight color default
Font size 0
Image path (blank)
Validation (blank)
Keyboard map (blank)
Focusable unchecked
Async unchecked
Properties Editor
Id (blank)
Name (blank)
X 525
Y 410
Height 40
Width 100
Zindex 0
Scale 1
Corner Radius 3,3,3,3
Auto Refresh checked
Auto Refresh Interval 0
Margin 0,0,0,0
Sort Order 0

Actions (8 total)

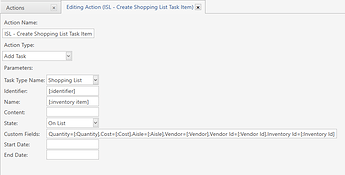
ISL - Create Shopping List Task Item (1 of 8)

Action Name: ISL - Create Shopping List Task Item
Action Type: Add Task
Task Type Name: Shopping List
Identifier [:identifier]
Name: [:inventory item]
Content: (blank)
State: On List
Custom Fields: Quantity=[:Quantity],Cost=[:Cost],Aisle=[:Aisle],Vendor=[:Vendor],Vendor Id=[:Vendor Id],Inventory Id=[:Inventory Id]
Start Date: (blank)
End Date: (blank)

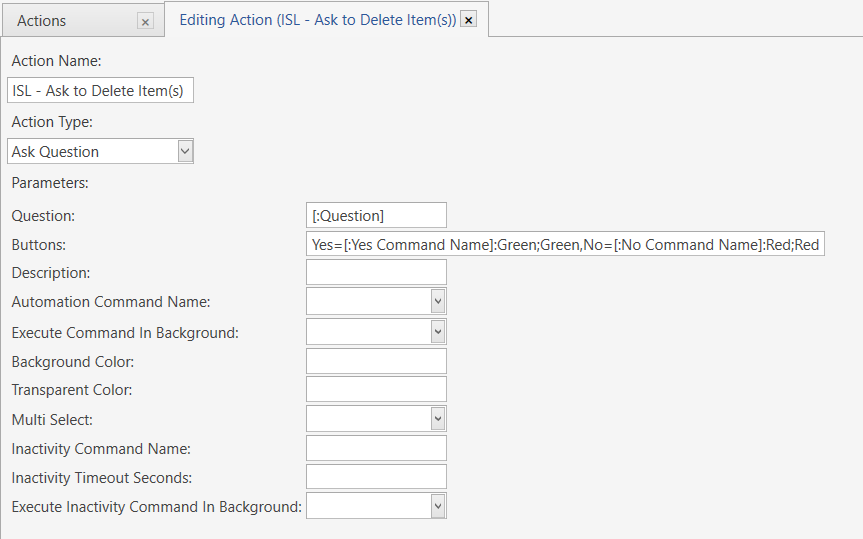
ISL - Ask to Delete All Items (2 of 8)

Name: ISL - Ask to Delete Item(s)
Action Type: Ask Question
Question: [:Question]
Buttons: Yes=[:Yes Command Name]:Green;Green,No=[:No Command Name]:Red;Red
Description: (blank)
Automation Command Name: (blank)
Execute Command in Background: (blank)
Background Color: (blank)
Transparent Color: (blank)
Multi Select: (blank)
Inactivity Command Name: (blank)
Inactivity Timeout Seconds: (blank)
Execute Inactivity Command in Background: (blank)

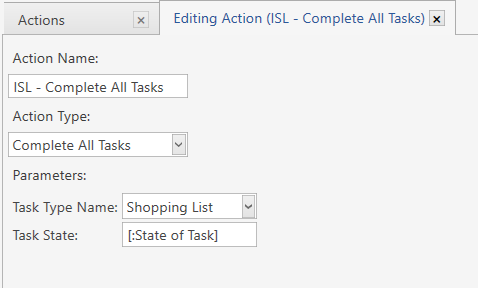
ISL - Complete All Tasks (3 of 8)

Action - ISL - Complete All Tasks

Name: ISL - Complete All Tasks
Action Type: Complete All Tasks
Task Type Name: Shopping List
Task State: [:State of Task]

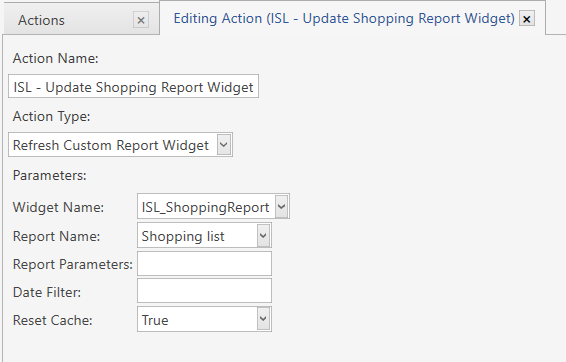
ISL - Update Shopping Report Widget (4 of 8)

Action - ISL - Update Shopping Report Widget

Name: ISL - Update Shopping Report Widget
Action Type: Refresh Custom Report Widget
Widget Name: ISL-ShoppingReport
Report Name: Shopping list
Report Parameters: (blank)
Date Filter: (blank)
Reset Cache: True

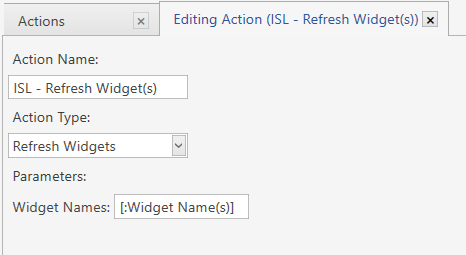
ISL - Refresh Widget(s) (5 of 8)

Action - ISL - Refresh Widget(s)

Name: ISL - Refresh Widget(s)
Action Type: Refresh Widgets
Widget Name: [:Widget Name(s)]

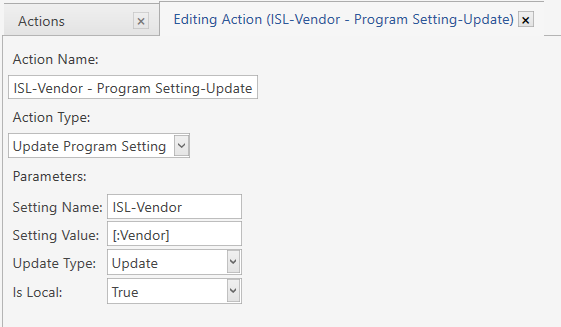
ISL-Vendor - Program Setting-Update (6 of 8)

Action - ISL-Vendor - Program Setting-Update

Action Name: ISL-Vendor - Program Setting-Update
Action Type: Update Program Setting
Setting Name: ISL-Vendor
Setting Value: [:Vendor]
Update Type: Update
Is Local: True

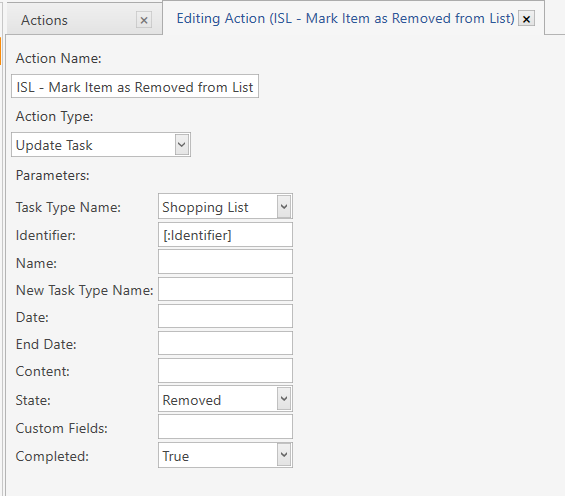
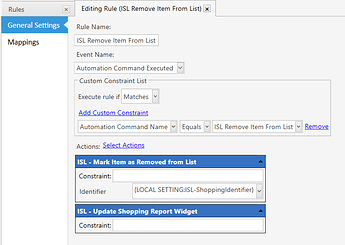
ISL - Mark Item as Removed from List (7 of 8)

Action - ISL - Mark Item as Removed from List

Name: ISL - Mark Item as Removed from List
Action Type: Update Task
Task Type Name: Shopping List
Identifier: [:Identifier]
Name: (blank)
New Task Type Name: (blank)
Date: (blank)
End Date: (blank)
Content: (blank)
State: Removed
Custom Fields: (blank)
Completed: True

ISL - Update Quantity (8 of 8)

Action - ISL - Update Quantity

Name: ISL - Update Quantity
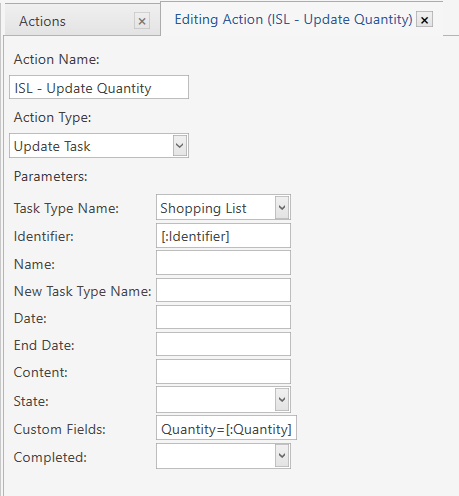
Action Type: Update Task
Identifier: [:Identifier]
Name: (blank)
New Task Type Name: (blank)
Date: (blank)
End Date: (blank)
Content: (blank)
State: (blank)
Custom Fields: Quantity=[:Quantity]
Completed: (blank)

Rules (8 Total)

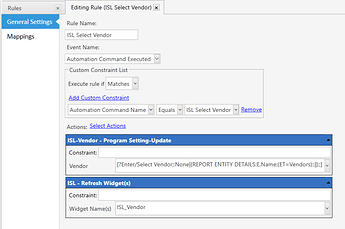
ISL Select Vendor (1 of 8)

Rule Name: ISL Select Vendor
Event Name: Automation Command Executed

Custom Constraint List

Execute Rule If: Matches
Automation Command Name Equals ISL Select Vendor

---- Actions ----

Action (1 of 2): ISL-Vendor - Program Setting-Update
Constraint: (blank)
Vendor:1 [?Enter/Select Vendor;;None|{REPORT ENTITY DETAILS:E.Name:(ET=Vendors)::|};;]
Action (2 of 2): ISL - Refresh Widget(s)
Constraint (blank)
Widget Name(s) ISL_Vendor

1 We are using a report in this prompt to give us a list of current entity Vendors. If you do not use entity Vendors, you can keep the report tag in the prompt. It will not cause any issues. Vendors can also be typed in the pop-up/prompt.
We will use None to fill in our program setting. In the next rule, we have a constraint to ask for a vendor if one is not present in the program settings.

ISL Add Item to List (2 of 8)

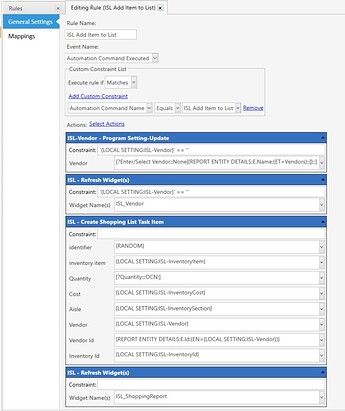
Rule Name: ISL Add Item to List
Event Name: Automation Command Executed

Custom Constraint List

Execute Rule If: Matches
Automation Command Name Equals ISL Add Item to List

---- Actions ----

Action (1 of 4): ISL-Vendor - Program Setting-Update
Constraint: '{LOCAL SETTING:ISL-Vendor}' == ''
Vendor: [?Enter/Select Vendor;;None|{REPORT ENTITY DETAILS:E.Name:(ET=Vendors)::|};;]
Action (2 of 4): ISL - Refresh Widget(s)
Constraint '{LOCAL SETTING:ISL-Vendor}' == ''
Widget Name(s) ISL_Vendor
Action (3 of 4): ISL - Create Shopping List Task Item
Constraint:
Identifier: {RANDOM}
inventory item {LOCAL SETTING:ISL-InventoryItem}
Quantity [?Quantity;;;OCN;]
Cost {LOCAL SETTING:ISL-InventoryCost}
Aisle {LOCAL SETTING:ISL-InventorySection}
Vendor {LOCAL SETTING:ISL-Vendor}
Vendor Id2 {REPORT ENTITY DETAILS:E.Id:(EN={LOCAL SETTING:ISL-Vendor})}
Inventory Id2 {LOCAL SETTING:ISL-InventoryId}
Action (4 of 4): ISL - Update Shopping Report Widget
Constraint (blank)

2 These fields are not necessary. I put this fields in to do a little foward-thinking. If, in the future, a report wants to be written of items or vendors that were put on the shopping list, these fields will be available. In the event a Vendor name or Item name needs to be corrected or changed, the report will not include the previous name. Vendor Id and Item Id overcome this limitation. The Id’s do not change, these fields should be used to create reports.

ISL Add Non-Inventory Item (3 of 8)

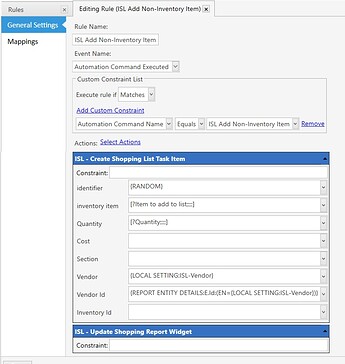
Rule Name: ISL Add Non-Inventory Item
Event Name: Automation Command Executed

Custom Constraint List

Execute Rule If: Matches
Automation Command Name Equals ISL Add Non-Inventory Item

---- Actions ----

Action (1 of 2): ISL - Create Shopping List Task Item
Constraint:
Identifier: {RANDOM}
inventory item [?Item to add to list;;;;]
Quantity [?Quantity;;;;]
Cost (blank)
Aisle (blank)
Vendor {LOCAL SETTING:ISL-Vendor}
Vendor Id {REPORT ENTITY DETAILS:E.Id:(EN={LOCAL SETTING:ISL-Vendor})}
Inventory Id (blank)
Action (2 of 2): ISL - Update Shopping Report Widget
Constraint (blank)

ISL Remove Item From List - Step 1 (4 of 8)

Rule Name: ISL Remove Item From List - Step 1
Event Name: Automation Command Executed

Custom Constraint List

Execute Rule If: Matches
Automation Command Name Equals ISL Remove Item From List - Step 1

---- Actions ----

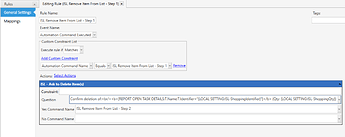
Action (1 of 1): ISL - Ask to Delete Item(s)
Constraint: (blank)
Question Confirm deletion of:<br/><b>{REPORT OPEN TASK DETAILS:T.Name:T.Identifier="{LOCAL SETTING:ISL-ShoppingIdentifier}"}</b> (Qty: {LOCAL SETTING:ISL-ShoppingQty})
Yes Command Name ISL Remove Item From List - Step 2
No Command Name (blank)

ISL Remove Item From List - Step 2 (5 of 8)

Rule Name: ISL Remove Item From List - Step 2
Event Name: Automation Command Executed

Custom Constraint List

Execute Rule If: Matches
Automation Command Name Equals ISL Remove Item From List - Step 2t

---- Actions ----

Action (1 of 2): ISL - Mark Item as Removed from List
Constraint: (blank)
Identifier: {LOCAL SETTING:ISL-ShoppingIdentifier}
Action (2 of 2): ISL - Update Shopping Report Widget
Constraint (blank)

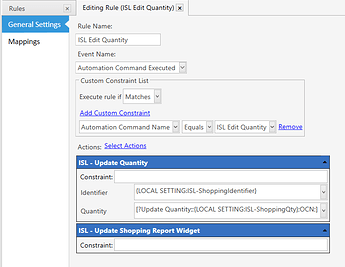
ISL Edit Quantity (6 of 8)

Rule Name: ISL Edit Quantity
Event Name: Automation Command Executed

Custom Constraint List

Execute Rule If: Matches
Automation Command Name Equals ISL Edit Quantity

---- Actions ----

Action (1 of 2): ISL - Update Quantity
Constraint: (blank)
Identifier: {LOCAL SETTING:ISL-ShoppingIdentifier}
Quantity [?Update Quantity;;{LOCAL SETTING:ISL-ShoppingQty};OCN;]
Action (2 of 2): ISL - Update Shopping Report Widget
Constraint (blank)

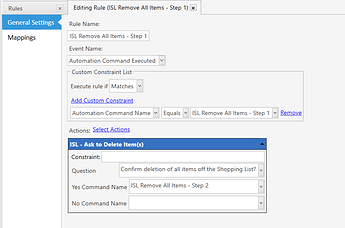
ISL Remove All Items - Step 1 (7 of 8)

Rule Name: ISL Remove All Items - Step 1
Event Name: Automation Command Executed

Custom Constraint List

Execute Rule If: Matches
Automation Command Name Equals ISL Remove All Items - Step 1

---- Actions ----

Action (1 of 1): ISL - Ask to Delete All Items
Constraint: (blank)
Question Confirm deletion of all items off the Shopping List?
Yes Command Name ISL Remove All Items - Step 2
No Command Name (blank)

ISL Remove All Items - Step 2 (8 of 8)

Rule Name: ISL Remove All Items - Step 2
Event Name: Automation Command Executed

Custom Constraint List

Execute Rule If: Matches
Automation Command Name Equals ISL Remove All Items - Step 2

---- Actions ----

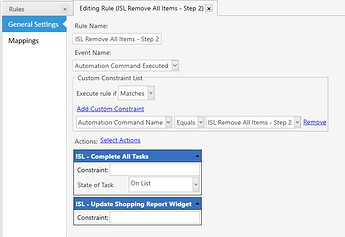
Action (1 of 2): ISL - Complete All Tasks
Constraint: (blank)
State of Task On List
Action (2 of 2): ISL - Update Shopping Report Widget
Constraint (blank)

Cleaning up the Shopping List Screen

Head back to the Shopping List screen.

Test to make sure everything works.

Hiding columns

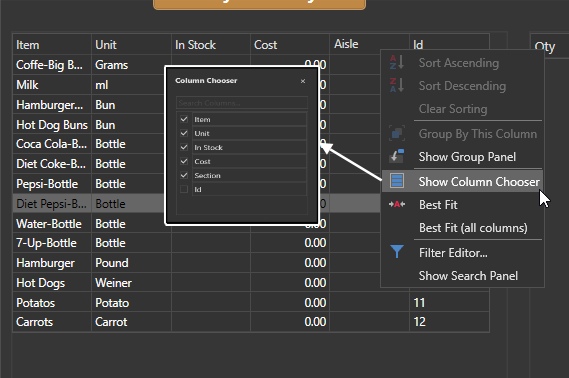
Column Chooser
Right click on any column header.
In the pop-up choose “Show Column Chooser”
Uncheck any column you do not want to see.
Resize column widths by dragging the width.

  • You may have to adjust the Report (under manage) Page size. 4
  • Or adjust the Zoom (in Design Mode under Settings). 4

4 Before entering into Design Mode or exiting the screen you may want to Save Changes by right clicking on the grid area and choosing “Save Changes”. The Shopping List widget will need at least one item on the list to access the pop-up menu.

  • If you need to start over from scratch, you can right click in the grid area and select “Reset Layout”. Exit out of the Shopping List screen and re-enter the screen.

Show Search Panel

Right click on any column header.
Choose “Show Search Panel”

  • Search will only work on visible columns.

Print Shopping List

When you have all the items added to your list, right click on the Shopping List report and select “Print Preview”.

1 post - 1 participant

Read full topic

Viewing all 231 articles
Browse latest View live